- DATE:
- AUTHOR:
- Cvent Product News Team

Plan & Promote Releases for August 19, 2026
Products covered under Plan & Promote are Registration, Abstract Management, Speaker Resource Center, Exhibitor Management, and Payments.
Registration
Train Travel in Dynamic Audience Segments
Event planners can now build rule-based Dynamic Segments using train travel data, for both Train Requests and Train Actuals. Planners can segment invitees based on whether a Train Request exists, what status it is in, or whether a confirmed Train Actual record has been added. This replaces the manual, export-and-filter workflow planners previously relied on to identify and communicate with invitees around Train travel. The feature is available on all existing and new events where Train Travel is enabled.
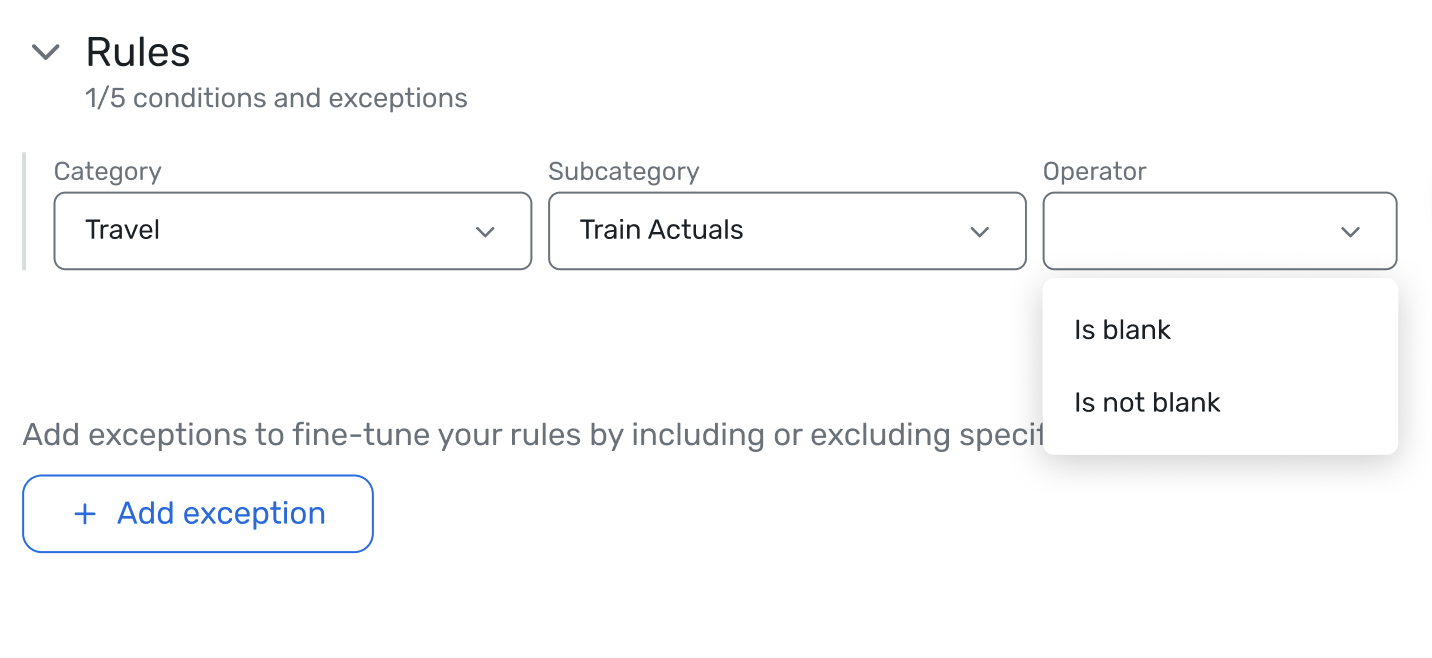
Train Requests and Train Actuals appear as new fields under the Travel information category in the Dynamic Segment rule builder, visible only when Train Travel is enabled for the event (via Travel > Travel Settings > Train Travel)
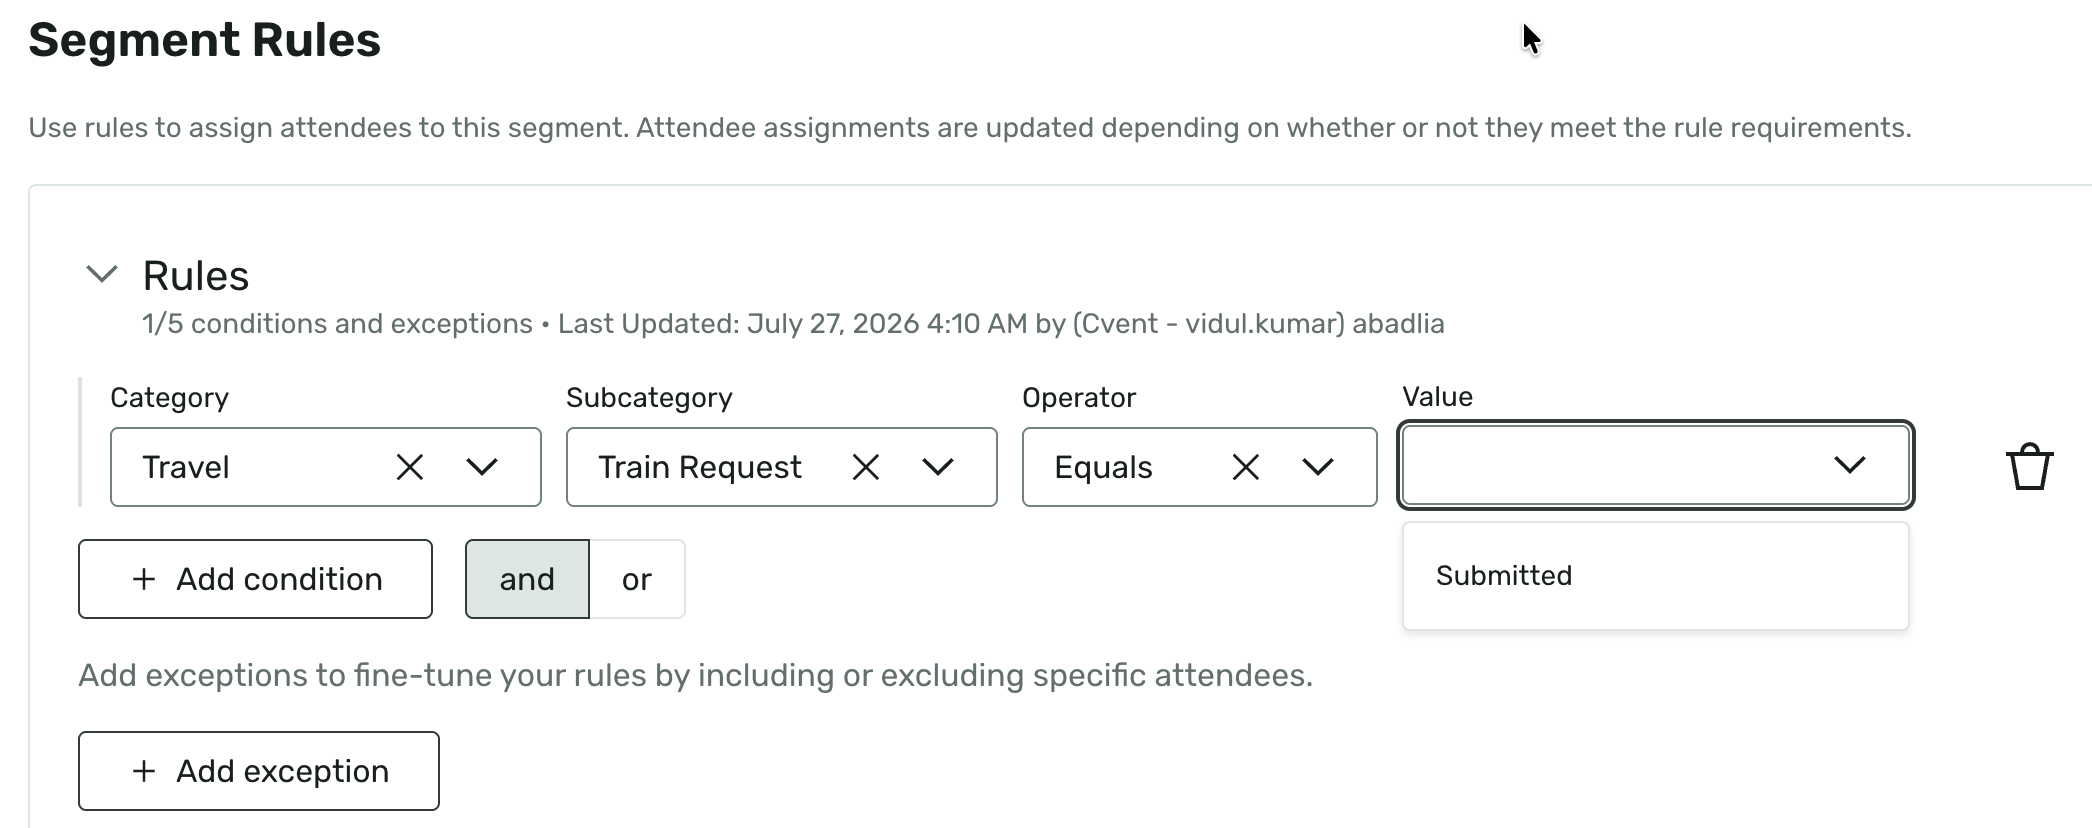
Supported operators for Train Requests: Equals, Does not equal, Includes any of, Does not include any of, Is not blank, Is blank
Supported operators for Train Actuals: Is not blank, Is blank
At launch, the only selectable status for Train Requests is Submitted. Additional statuses (Processing, Approved, Reserved, Denied / Not Available, Canceled, Pending, Ticketed, Waitlisted) will become available when the ability to manage Train Request statuses is introduced in a future release.
Editing non-status details on a Train Request (travel dates, departure/arrival stations, route preferences) does not affect segment membership
For Equals and Includes any of: a condition is true if any one of an invitee's Train Requests matches the selected status, meaning multi-record invitees are evaluated across all their records
Segments refresh automatically when a Train Request is created, or it is removed, and when a Train Actual is added or removed
Train Request and Train Actual conditions can be combined with any other Dynamic Segment rules using AND/OR logic
Use Case Examples
Identify invitees who have submitted a Train Request
A planner wants a list of all Train travellers for pre-event logistics.Example condition: Train Requests Is not blank
What this enables:
Build a targeted communication list for Train-specific briefings
Identify invitees who have not submitted a Train Request
A planner wants to nudge invitees who haven't arranged their Train travel yet.Example condition: Train Requests Is blank
What this enables:
Drive Train Request submission before a registration deadline
Exclude this group from logistics communications meant only for confirmed travellers
Identify invitees with a confirmed Train Actual
A planner wants to reach only those invitees for whom a Train Actual has been recorded.Example condition: Train Actuals Is not blank
What this enables:
Send final travel confirmation details to confirmed Train travellers
Combine Train travel conditions with other segment rules
A planner wants to reach invitees from a specific company who have a Train Request on file.Example condition: Train Requests Is not blank AND Company Equals Acme Corp
What this enables:
Build precise, multi-criteria targeting without creating multiple separate segments
Layer Train travel signals onto registration or demographic data for more relevant communications
Build Your Own Reports: Hotel Request Report
The Hotel Request report is now available in Build Your Own Reports (BYOR). Planners can now build custom reports of attendee hotel request data within an event. They can select the fields they need, apply filters, and save specific report configurations for reuse and copying. Planners can now tailor hotel request reporting to their unique needs, without the limitations of a templated structure.
Planners can now:
Pick from fields across hotel information, travel questions, registration details, contact and address details, credit card data, audit information, invitee counts, and question responses.
Filter by request date range, canceled request status, or advanced criteria on any field in the report, so that they are always looking at the right breakdown of data.
Set their own column order, groupings, and sorting — by hotel, room type, check-in date, or what best works for how the team reviews rooming data.
Save report configurations so housing managers, event planners, and onsite staff can all use a consistent shared view.
How to access this report?
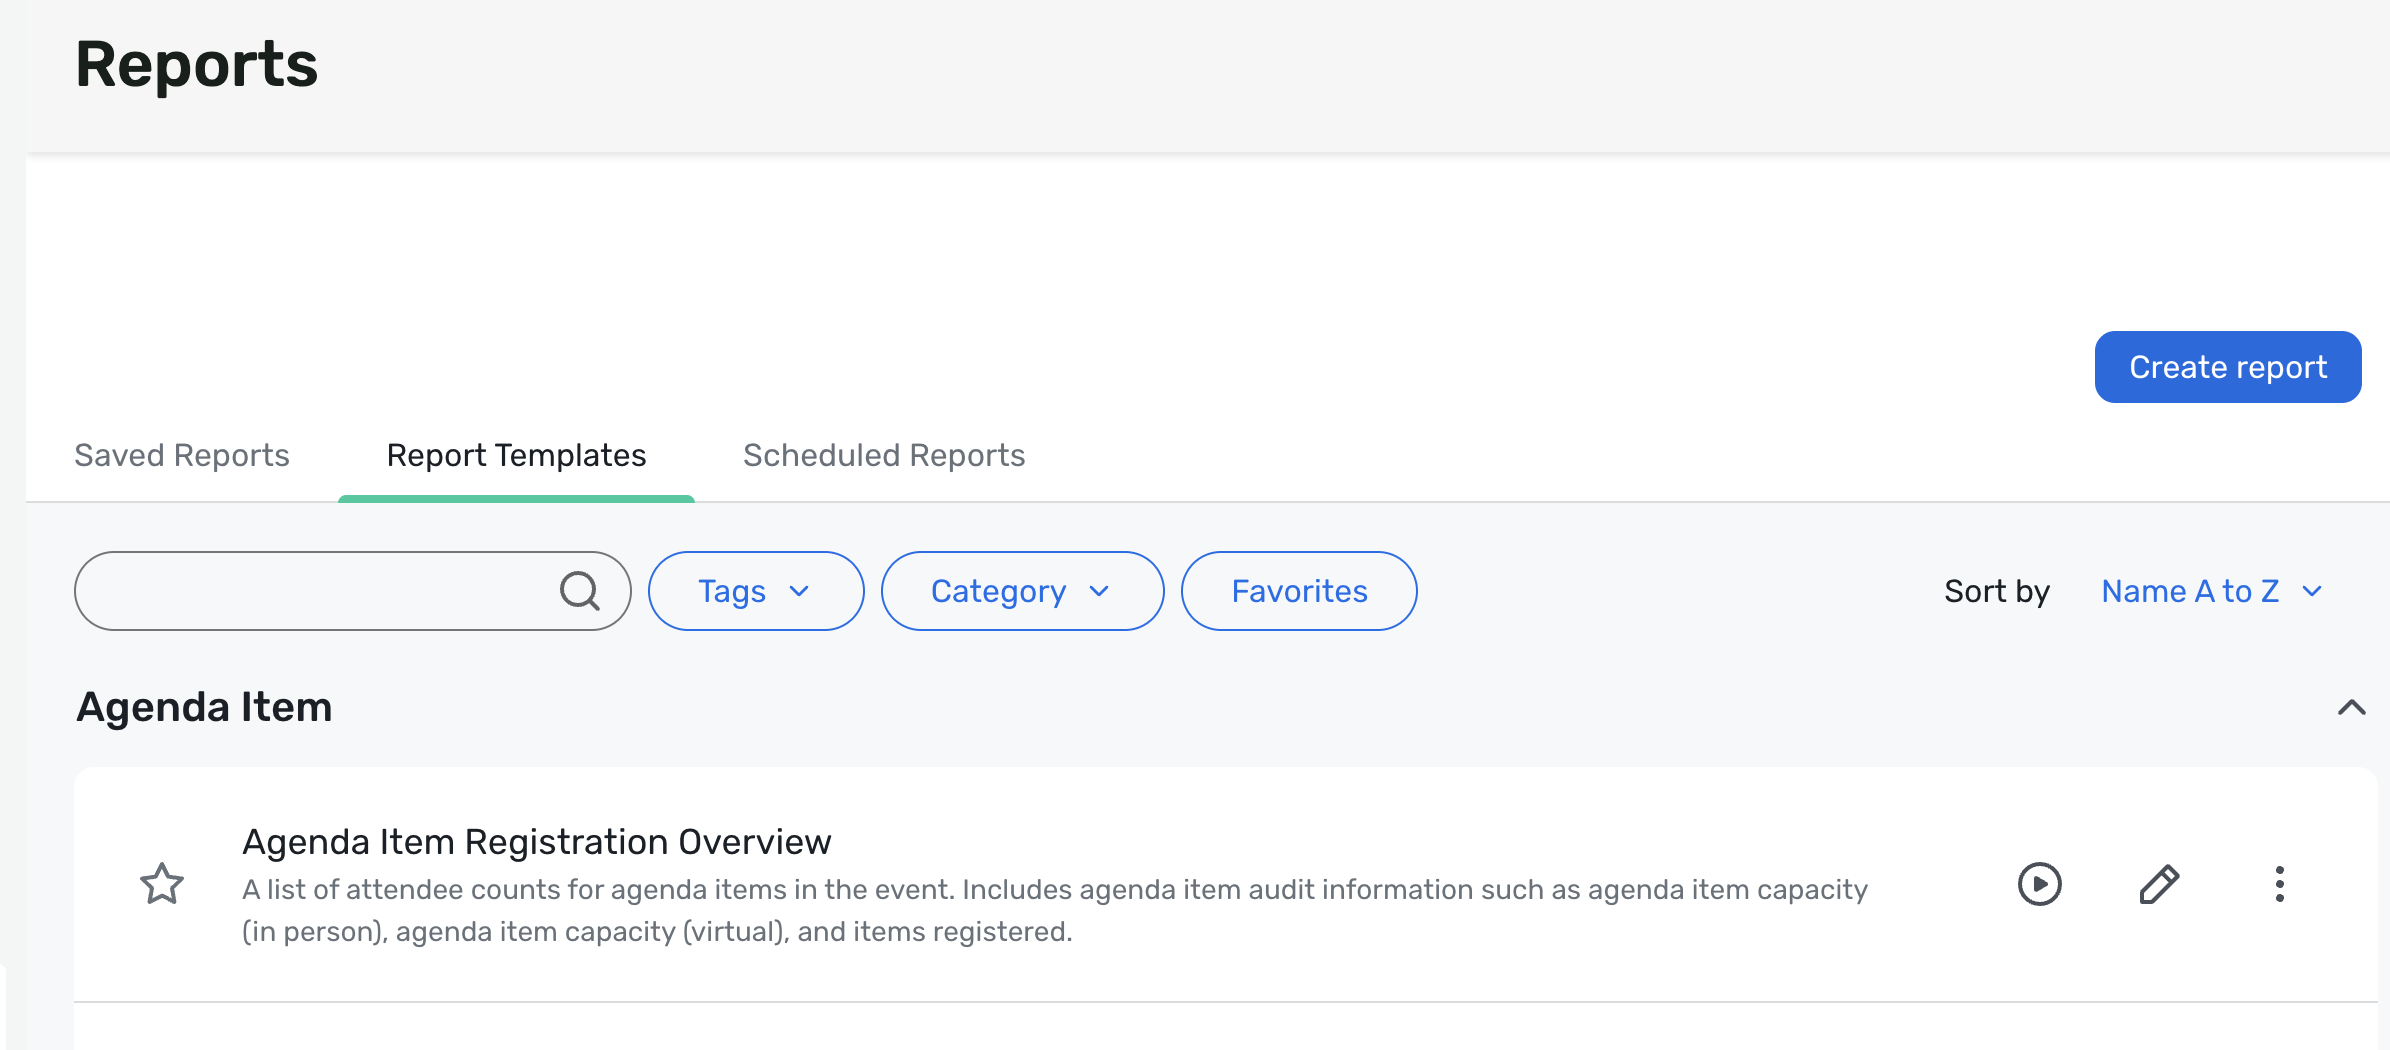
Navigate to the Event > Reports and click on Create Report on the top right of the screen:
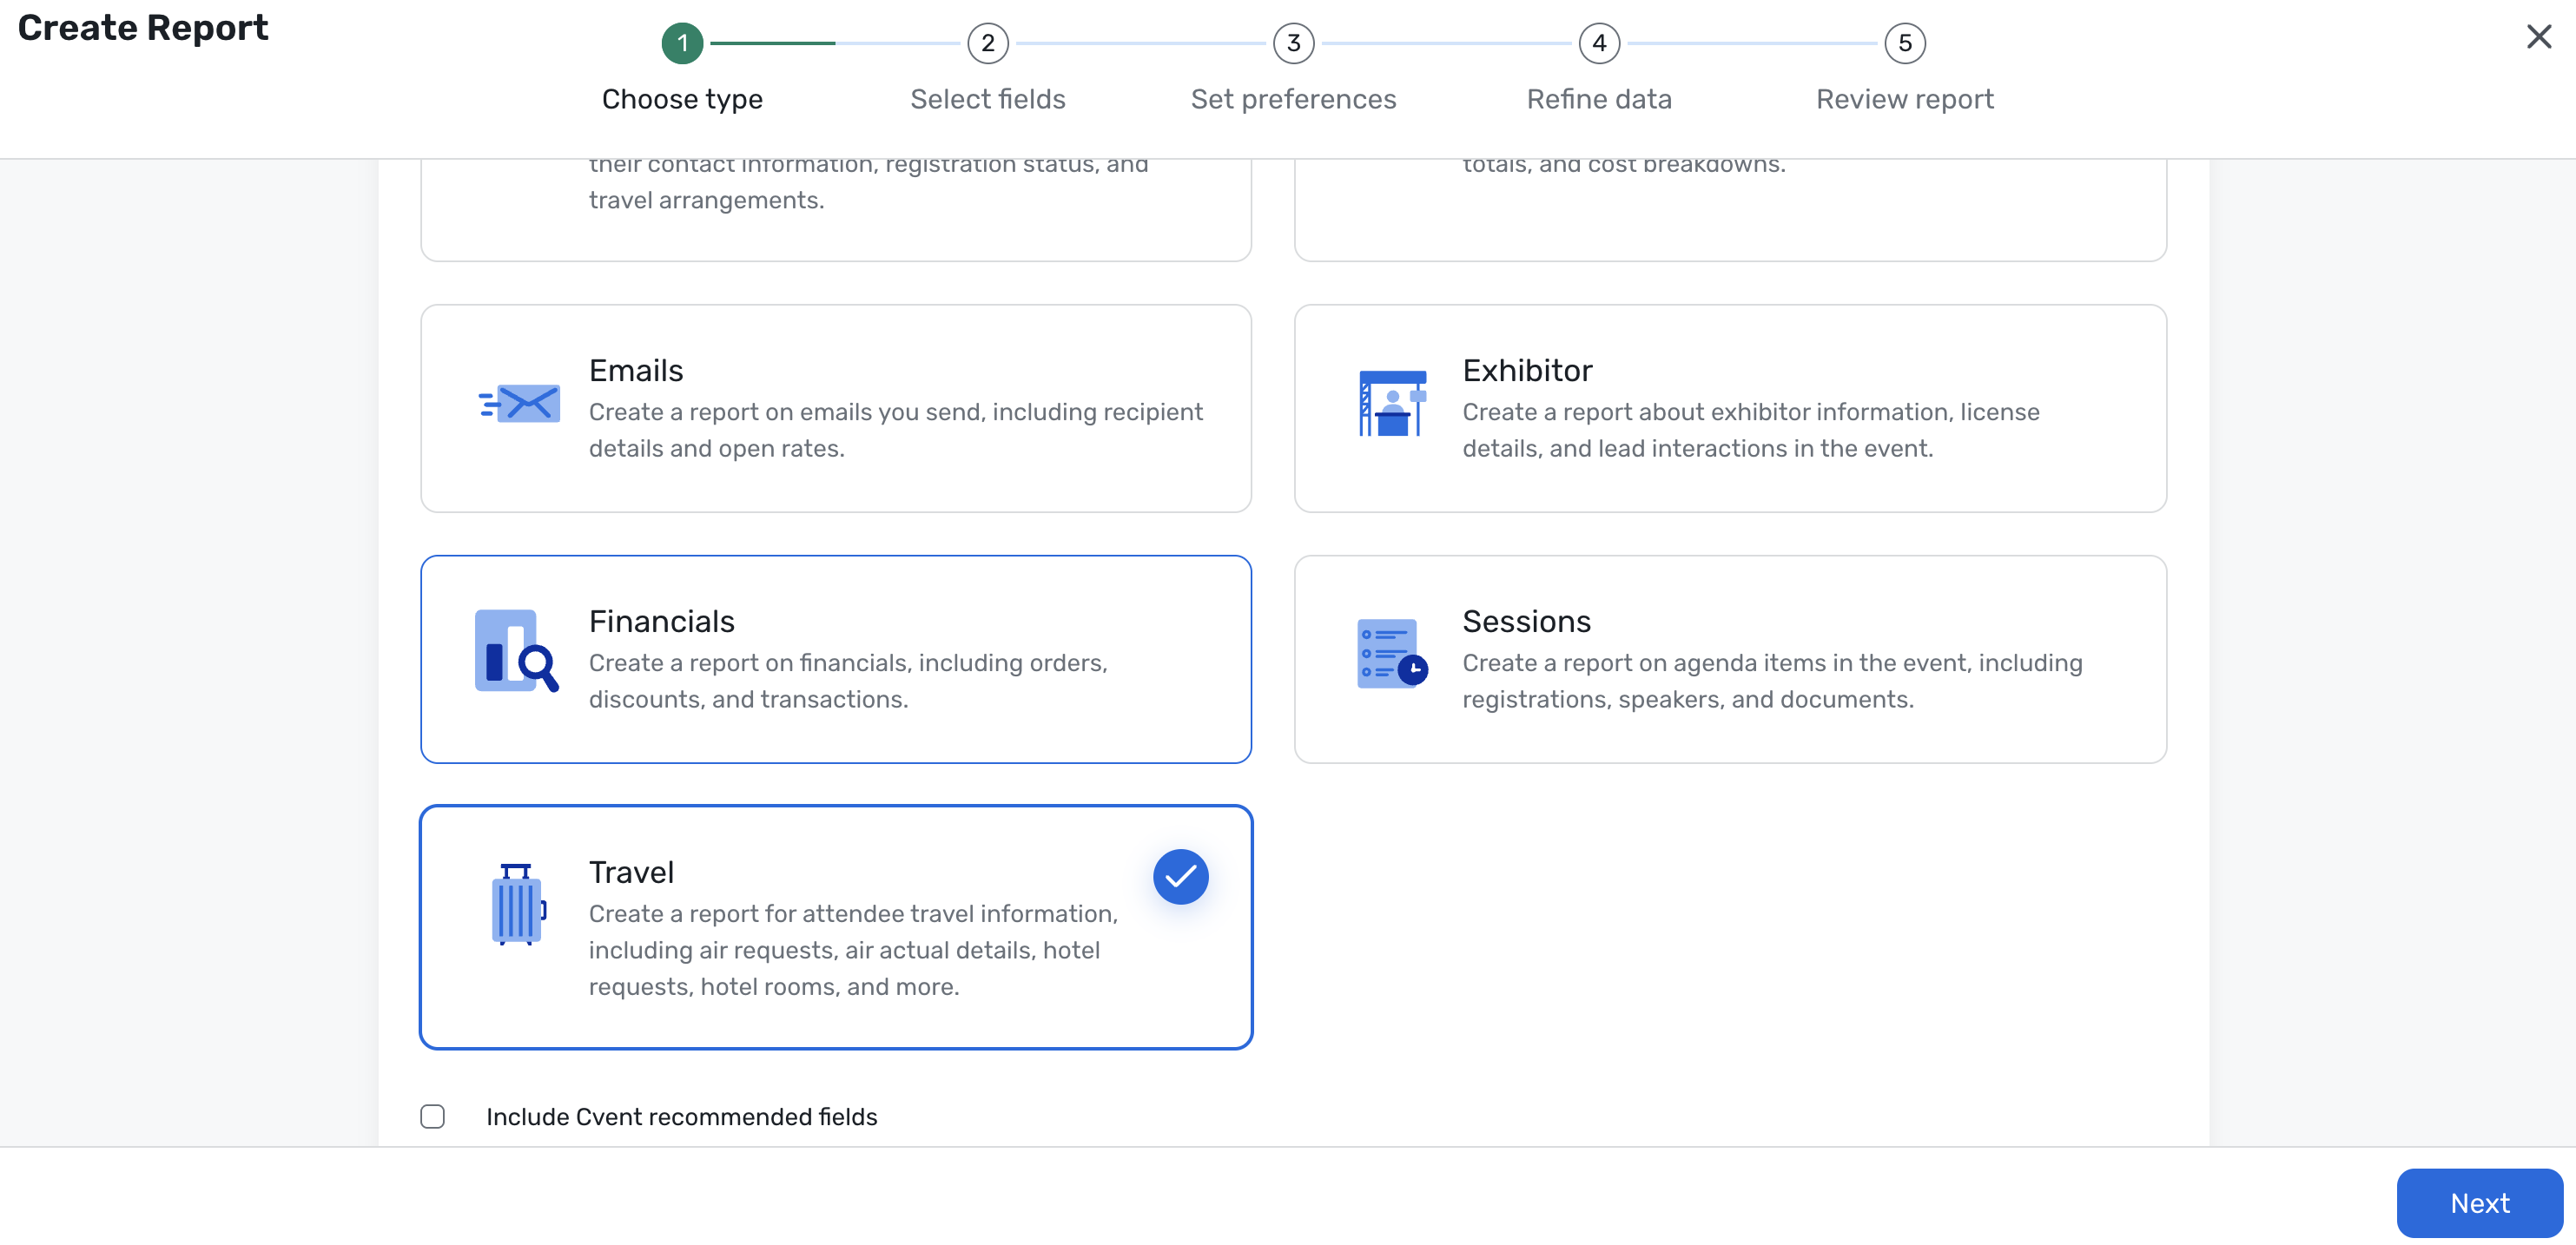
Select Travel as the Report Type:
Walk through the steps in the Report Builder for field selection, display preferences, filters, and running or exporting the report:
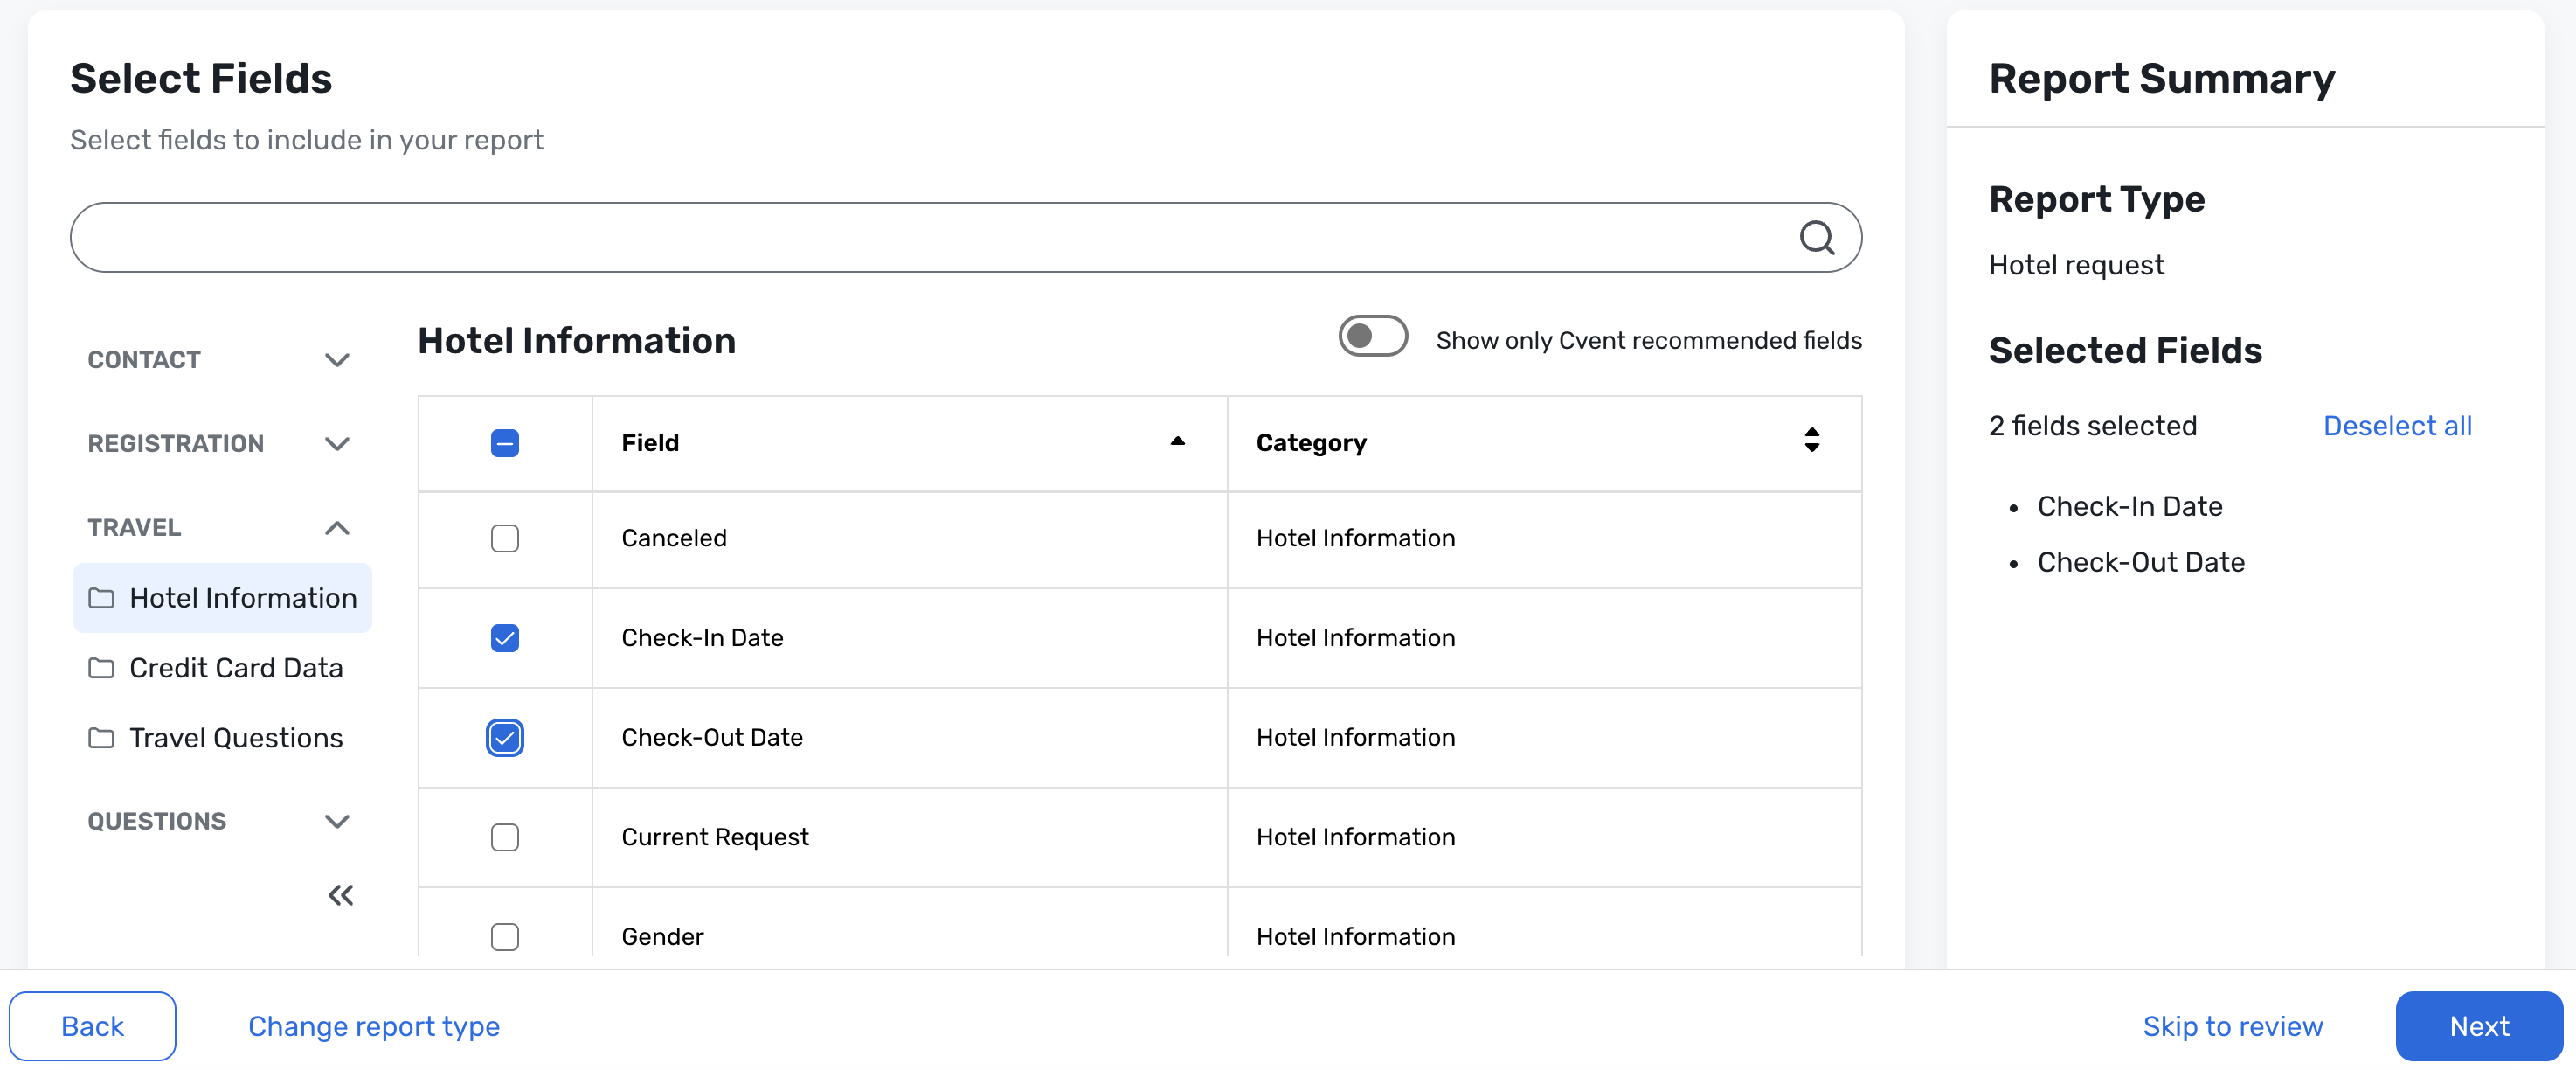
Note: The Travel report type currently supports Hotel Requests only. Flight Requests, Air Actuals, and other travel types are on the roadmap and will be added over the coming months.
Section Templates User Permissions
Section Templates now follow admin-level user permissions, giving planner admins more control over who can manage shared section content. This helps reduce accidental deletions, keeps template libraries more organized, and makes it easier for large teams to govern reusable sections consistently.
Things to know:
Section Template management is now controlled through the existing Templates permission under Administrative settings.
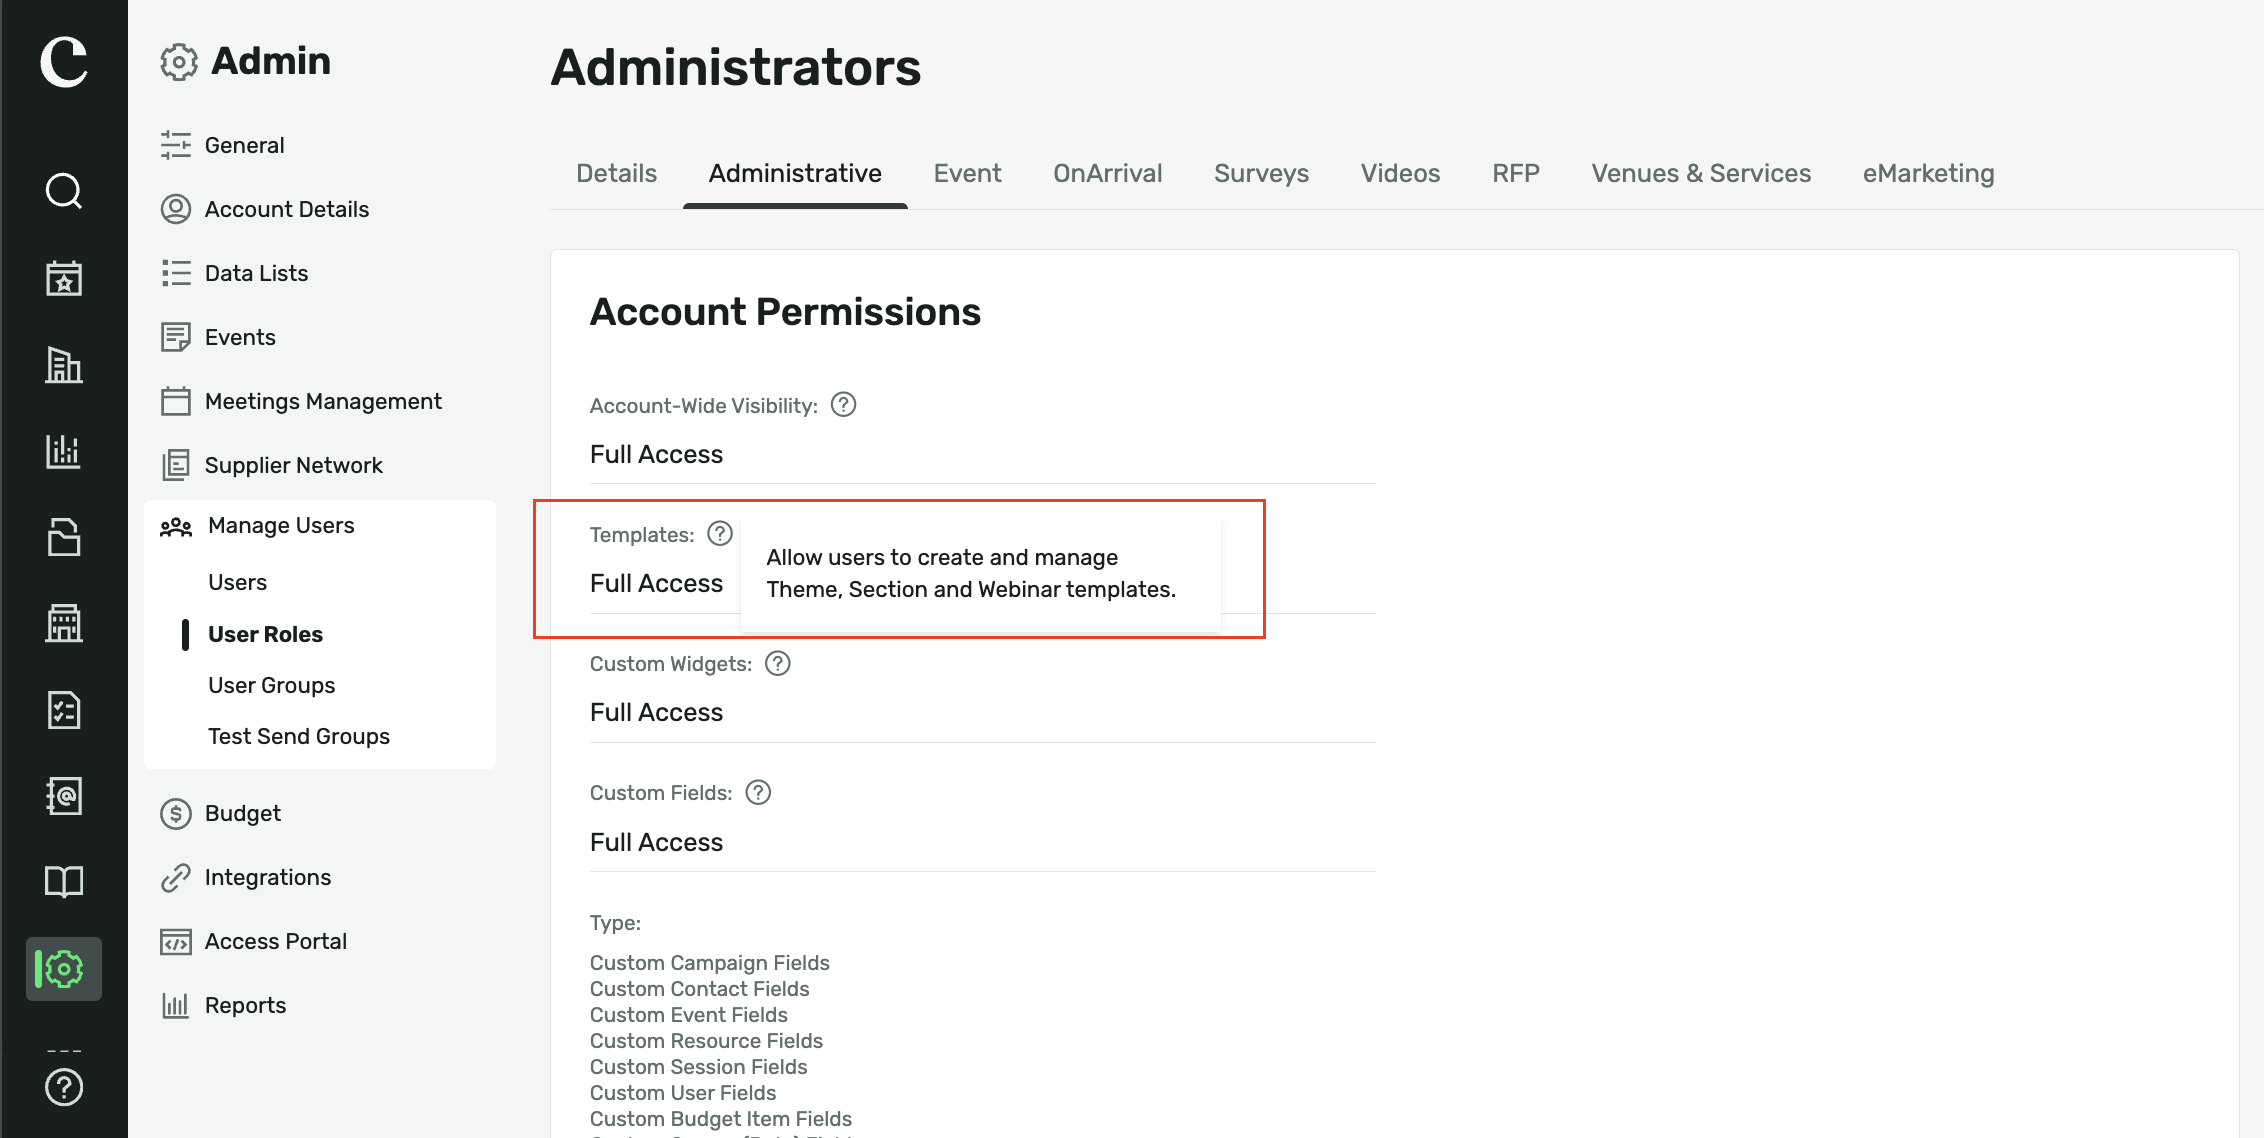
Users with "full access" can save, rename, and delete section templates.
Users without access can still use available sections in their websites, but they cannot save, rename, or delete section templates.
This permission is managed at the admin level and does not introduce a separate event-level permission.
Updated permission help text clarifies that the Templates permission now includes Section Templates, along with other applicable template types.
EU E‑Invoicing Now Available for All Supported Countries
Following our initial rollout in Belgium, we’re excited to announce the next phase of our EU e-invoicing initiative. Registration now supports webhook-based delivery of the data required to generate EN 16931 compliant XML e-invoices for all EU countries that require e-invoicing, not just Belgium. Cvent does not generate or transmit e-invoices directly. Instead, when a registration order is created or canceled, Cvent sends the relevant data in real time to your Access Point Provider, which can then create the e-invoice and deliver it to the buyer’s access point.
What's new
Expanded country coverage
E-invoicing support is no longer limited to Belgium. Planners running events for attendees in EU countries that require e-invoicing can now configure their event to send the required invoice data through a webhook, using the same seller and buyer data model introduced with the Belgium release and now extended for broader country support. This webhook-based approach can also be used outside the EU, where local requirements and the customer’s provider support Peppol or a similar e-invoicing network.
Webhook-based, automatic delivery
Previously, e-invoices had to be downloaded manually. With this release, Cvent can automatically send the required invoice data to your Access Point Provider through a webhook, replacing the manual download step in Cvent. The Access Point Provider can then generate the XML e-invoice and deliver it to the buyer’s access point. As part of this transition, the manual download option is being retired.
The invoice data required (Seller data pulled from your event's E‑invoices configuration, combined with buyer data collected during registration) is delivered to your Access Point Provider via webhook. Your Access Point Provider generates the e-invoice in the desired format.
How it works
Configure seller e‑invoicing details — In your event, go to Pricing → E‑invoices tab and enter your legal entity, address, and tax/VAT identifiers.
Create contact custom fields — In Admin → Custom Fields → Contacts, add the buyer‑side fields required by your country (e.g., legal entity name, VAT ID, Peppol delivery ID, buyer reference, etc.).
Add registration logic — Add a "Do you need an e‑invoice?" choice question with visibility logic tied to invitee country, and surface the relevant buyer fields on the registration form only when needed.
Set up the webhook — In Admin → Integrations → Push API Integrations → Create Integration:
Select Type: Webhook
Enter the endpoint URL provided by your Access Point Provider
Choose Token‑based or OAuth authentication (confirm with your Access Point Provider) and enter the relevant credentials
Save, then under Integration Points, add "Invitee/Guest Order Created" and set it to Active
Enable the webhook in the event where you need e-invoicing - Go to your Event → Integrations → Webhooks and enable the webhook that you configured in admin (in step 4 above).
Note: Steps 2 and 4 are a one-time configuration that does not need to be repeated for each event.
Once configured, Cvent will automatically send a JSON file with the information needed for invoice creation every time an order is created or canceled to your Access Point Provider — no manual download needed.
Auto-Enabled Waiting Room for High-Demand Registrations, Powered by Queue-it
Registration now automatically creates a waiting room, powered by Queue-it, whenever an event experiences a sudden, unexpected surge in visitor traffic. This protection runs quietly in the background and is designed to keep high-demand events stable and fair for every attendee.
For most events, the feature will never activate. It exists to guard against rare, high-velocity traffic spikes, such as those driven by social media posts, influencer announcements, or public ticket drops, where hundreds or thousands of visitors arrive within seconds of one another. When that happens, attendees are placed in a virtual queue instead of overwhelming the registration platform, and they are then admitted back to the site in a steady, controlled flow.
A Reminder: What Is Queue-it?
Queue-it is a virtual waiting room solution that Cvent uses to manage high-demand registration launches. When traffic to an event exceeds what the platform can safely handle all at once, Queue-it holds incoming visitors in a queue and releases them back to the website in a controlled flow.
For events where a surge in traffic is anticipated, Cvent's Support team works directly with planners in advance to configure a dedicated waiting room. This includes setting the rate at which attendees are released, customizing the waiting room with event branding, and preparing attendee-facing messaging so registrants know what to expect. If you are planning a high-demand event and want to get ahead of this, see the Things to Note section below.
How It Works
Traffic is monitored continuously across Registration using a rolling window. If an event reaches 600 unique visitor sessions in 1 minute or 1,000 in 3 minutes, a Queue-it waiting room is automatically created and activated for that event. These thresholds are subject to change as we learn more about traffic patterns.
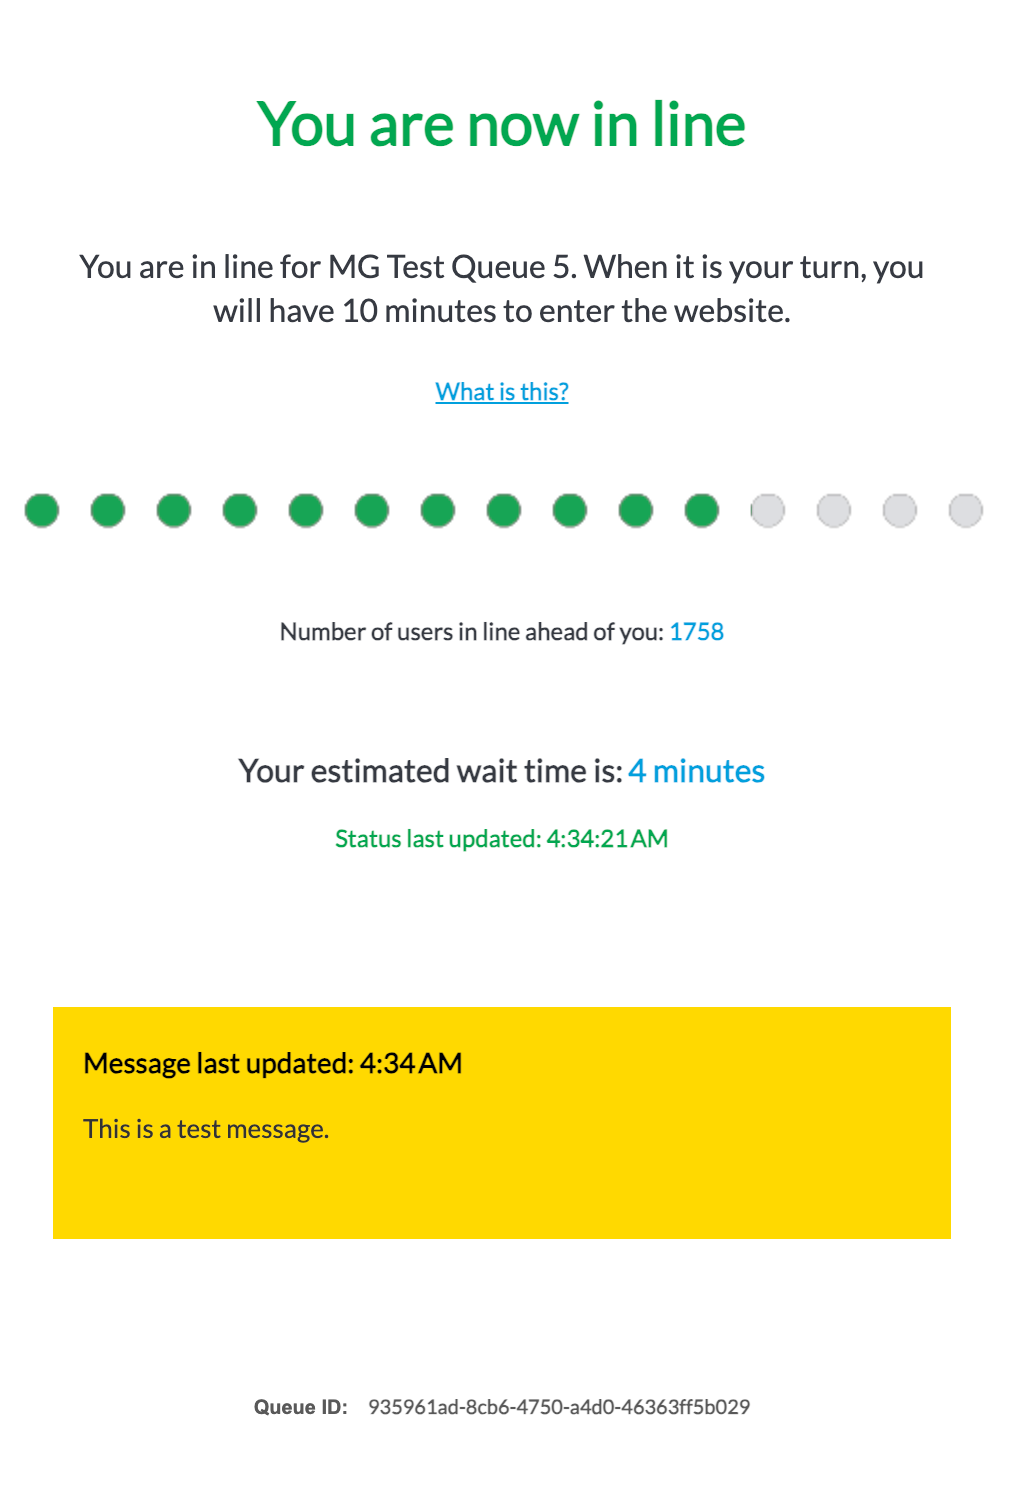
Registrants will be redirected to the following page:
Only net-new visitors arriving after the threshold is crossed are routed into the waiting room. Attendees already on the event page are not affected.
If a Queue-it waiting room has already been manually configured for the event, that queue takes precedence and no auto-provisioned queue will be created.
Things to Note
The traffic thresholds that trigger a waiting room are not configurable. They reflect what the platform defines as high-risk traffic levels, set this way to protect every event running simultaneously rather than only the one experiencing the spike.
Attendees placed in a waiting room will see a Queue-it waiting room page. The waiting room uses a standard default template as displayed above.
Planners are not notified in real time when an auto-provisioned queue activates. If attendees report being placed in a waiting room unexpectedly, contact Cvent Support for visibility into what triggered it and current queue status.
If you are planning a large event and anticipate high registration demand at launch (more than 5,000 registrations in the first 30 minutes of registration or more than 10,000 visitors in the first 30 minutes), reach out to your Cvent representative ahead of time. They can help you understand the waiting room experience, set appropriate expectations with attendees, and explore whether a custom-configured queue is the right fit for your event.
REST API Account Level Endpoints: Orders and Transactions
REST API users will be able to retrieve orders and transactions across an entire Cvent account, without needing to iterate event by event. New account-level REST endpoints for orders and transactions make it practical to run daily, weekly, or monthly financial syncs to data warehouses and internal systems at scale, thereby increasing operational efficiency through financial reconciliation workflows.
The following endpoints will be available in the developer portal:
GET /transactions
GET /transactions/{transactionId}
GET /transactions/{transactionId}/items
GET /transaction/{transactionId}/items/{transactionItemId}
GET /orders
GET /orders/{orderId}
GET /orders/{orderId}/items
GET /orders/{orderId}/items/{orderItemId}
Why It Matters
Until now, retrieving orders and transactions across an account required calling the event-scoped endpoints once per event. For accounts with hundreds of events, that means thousands of API calls just to get a single day's worth of changes. Now, a single paginated call can return all orders or transactions that have changed across the entire account since that timestamp. Integrations that previously required complex fan-out logic are now straightforward delta queries.
This is especially valuable for teams running recurring data pipelines — daily warehouse syncs, hourly CRM updates (e.g., Salesforce opportunity reconciliation), and invoice/accounting integrations that need a reliable stream of financial activity without event-by-event enumeration.
Things to Note
Eventual consistency lag: Data flows through a change-data-capture pipeline before it is queryable. It is possible to have a few minutes' lag between when an order or transaction is created or updated and when it appears in the endpoint response. Integrations using lastModified as a sync cursor should build in an overlap window to avoid silently missing records that were written just before the poll window opened.
These are read-only endpoints
The existing event-level endpoints for orders and transactions remain available and are unaffected by this release
Allow Group Leaders to Duplicate their Selections
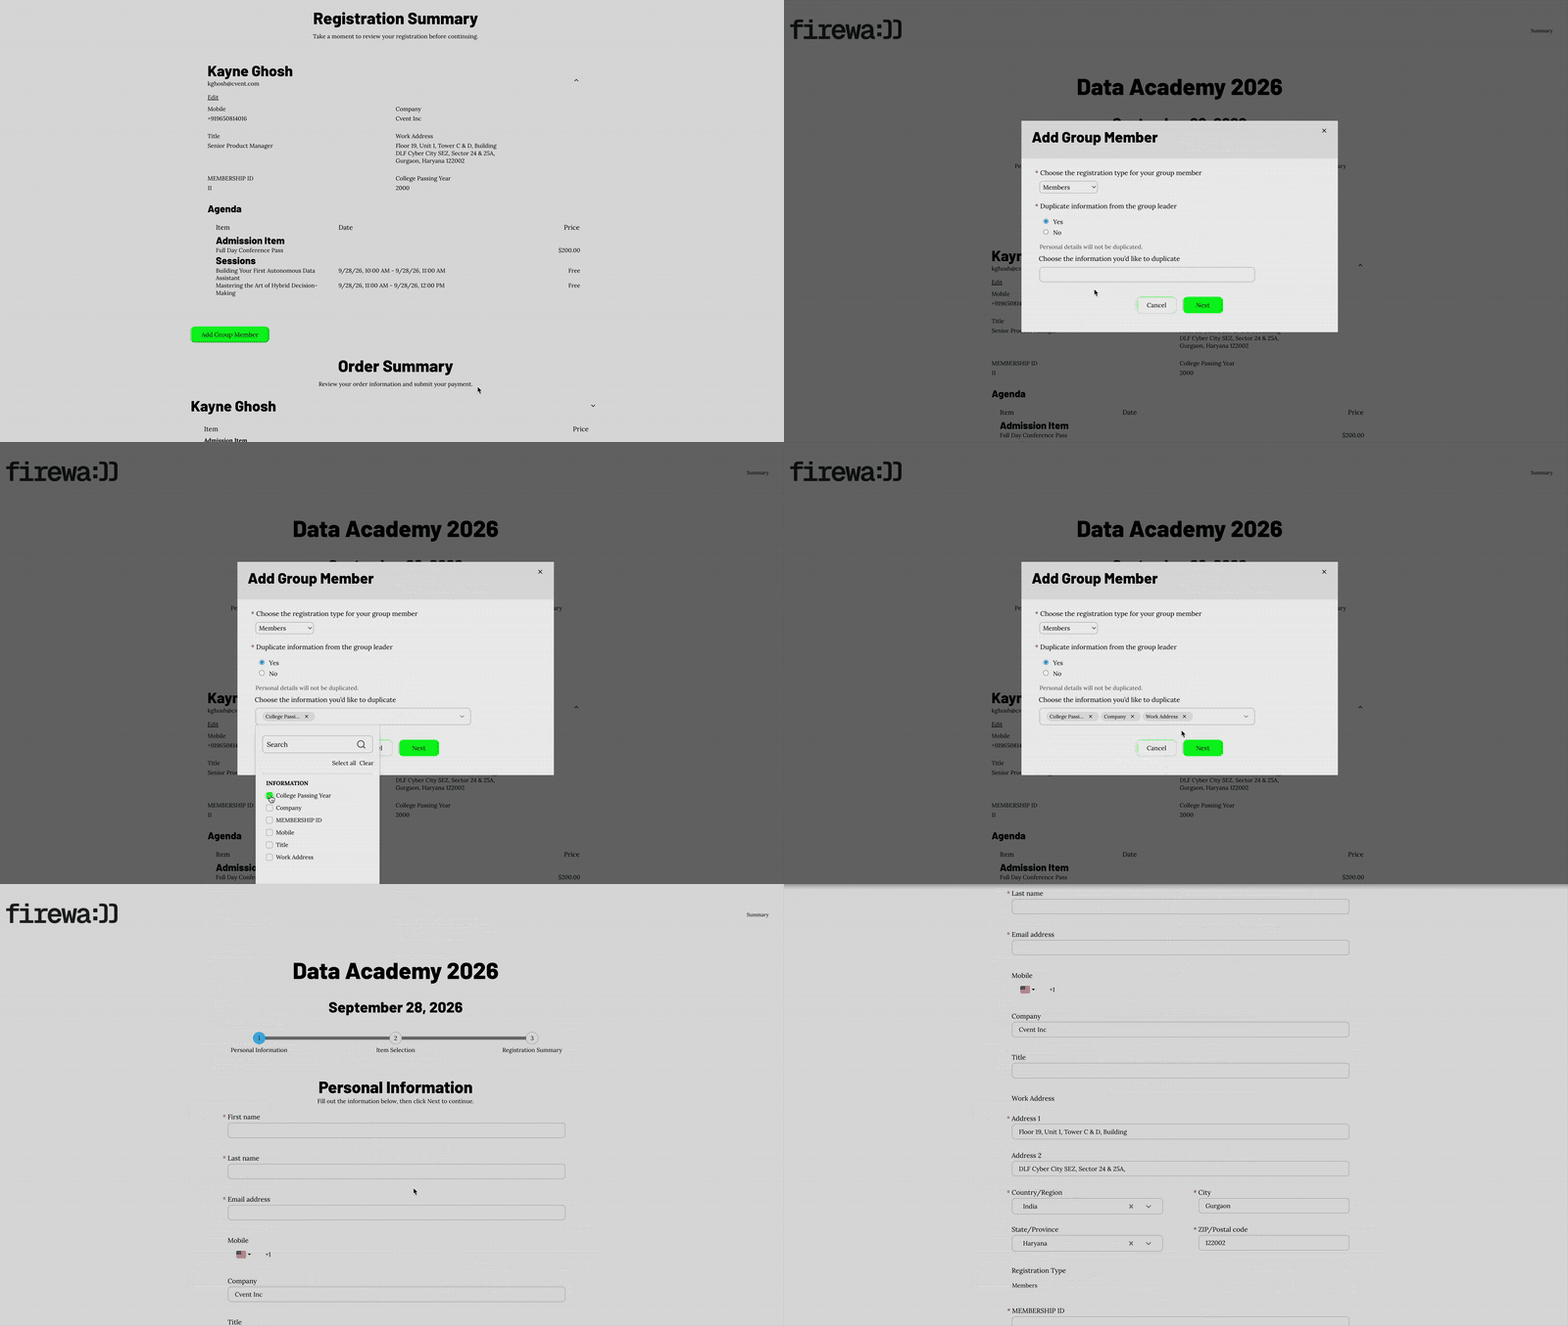
Registering a group should feel streamlined, not repetitive. Today, group leaders often have to re-enter the same information for every attendee they add. This release removes much of that friction by allowing eligible shared information from the group leader’s registration to be auto-filled for group members.
The result is a faster, smoother way to register teams and add members over time, with less manual effort, fewer opportunities for data entry errors, and a more intuitive experience for large-group registrations.
What do you need to know?
Group leaders can duplicate eligible shared contact information (Standard Contact Fields and Custom Contact fields) from their own registration when adding group members.
This experience is available both during initial group registration and post-registration, so the behavior stays consistent whether members are added now or later.
Only eligible fields are auto-filled. A field must exist on both the group leader and group member registration paths, and its configuration must be compatible with duplication.
If a field exists only on the group leader path, it is ignored for auto-fill. If a field exists only on the group member path, it remains blank and must still be completed if required.
When a second group member is added, previous duplication selections are retained to further reduce duplicate work.
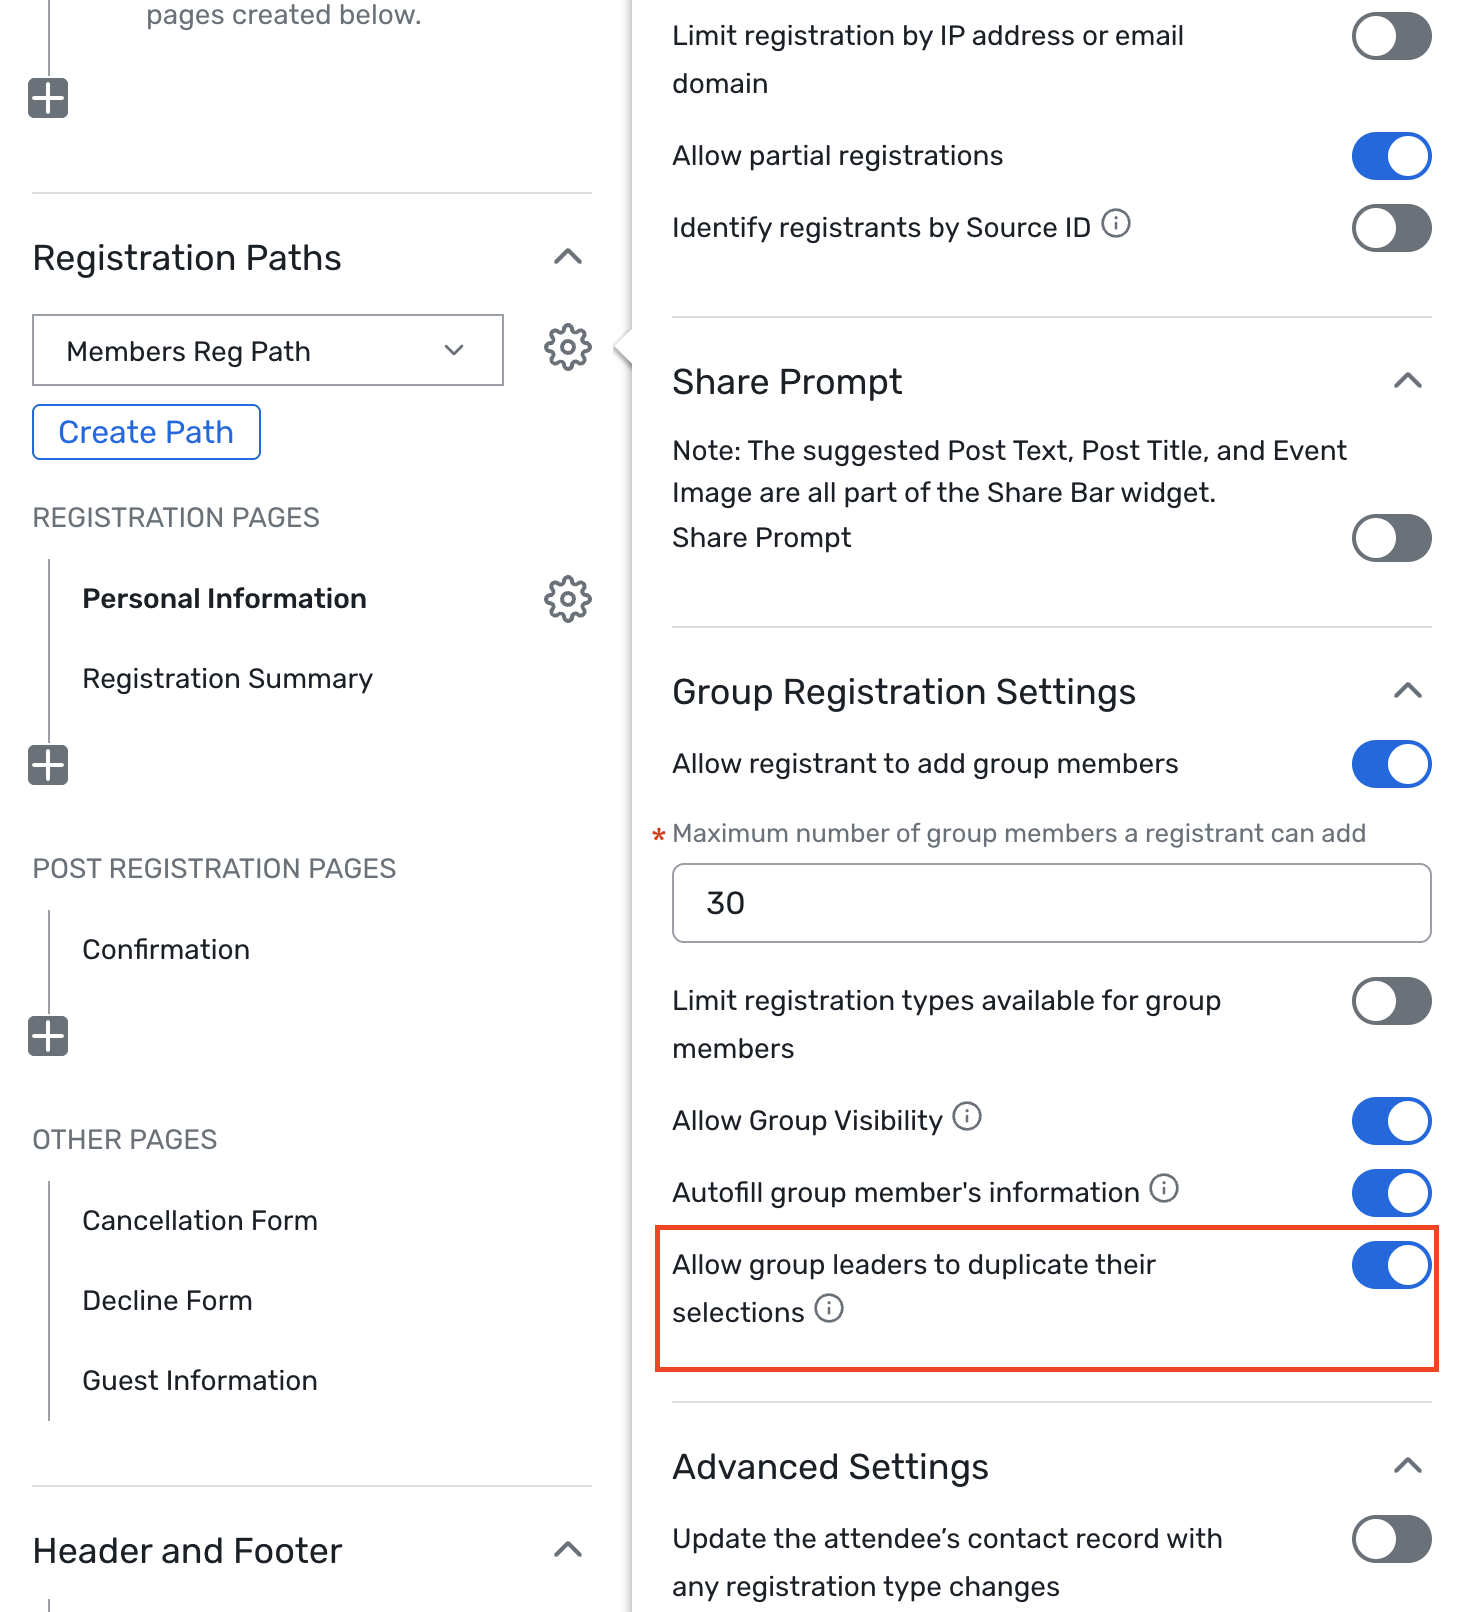
On planner side, a new Site Designer setting “Allow group leaders to duplicate their selections” lets planners decide whether group leaders can use this autofill experience during registration
For existing events, the new setting remains disabled upon release unless Group Members is enabled later.
For new events, when Group Registration is enabled, this planner setting is auto-enabled by default.
Use Cases Examples
A group leader is adding multiple members with mostly similar information but still needs flexibility for differences between attendees. Auto-fill speeds up the common fields, while member-specific fields can still be completed manually where needed.
A corporate travel coordinator is registering a sales team for an event and needs to add several attendees from the same company. Shared details can carry forward, so they can move faster through registration without re-entering the same information for each attendee.
A group leader starts registration for a customer delegation today but needs to add more attendees next week. When they return to group management, they can continue building the group without repeating the same setup work from the first session.
An admin is registering attendees who share the same organization, contact details, or common selections across registration paths. Eligible fields can be reused, helping them complete a high-volume registration more efficiently.
REST API: File Upload Link in Attendee Endpoints
When attendees answered a file-upload question, planners could previously see only the file name — not the file itself. This update makes it easy to access those files directly by returning a download link alongside the filename.
What's Now Possible
You can now get a direct download link for any file an attendee has uploaded, without having to track it down manually. This makes it much easier to review, store, or process attendee-submitted files as part of broader workflows.
Key Highlights and Changes
Attendee API responses now include a download link for any file upload question answers.
The link can be used to access the uploaded file directly.
No changes are needed to existing API calls — the download link is simply included as an additional field in the response.
Additional Resources
Cvent Community: Questions about the above updates? As always, get answers in the Community via the Open Forum.
Beta Opportunities Page: Try new features and products out before full launch availability. Join Beta Programs.