- DATE:
- AUTHOR:
- Cvent Product News Team

Plan & Promote Releases for November 18, 2026
Products covered under Plan & Promote are Registration, Abstract Management, Speaker Resource Center, Exhibitor Management, and Payments.
Registration
Email Templates for Standard Events
We are introducing Email Templates for Standard Events, giving you a way to standardize and reuse proven event emails and keep event communications on-brand and compliant across the account.
Before this release, you had to set up emails from scratch for every new event, often rebuilding communication sets you had already perfected for similar events. Admins have no way to define what a good set of event emails looks like or make sure planners start from it, so brand, tone, and required content vary from event to event and inconsistencies are usually caught only after emails have reached attendees.
With this release, you can save emails from an existing event as a template, admins can govern those templates from the Admin Library, and the right template is automatically applied or offered for selection when a new event is created. Instead of every event starting from Cvent default emails, events can now start from an admin-approved baseline, while Cvent default emails continue to apply wherever no template matches.
Note: This release applies to Standard events only and is separate from Essentials and Webinar email templates.
Key capabilities include:
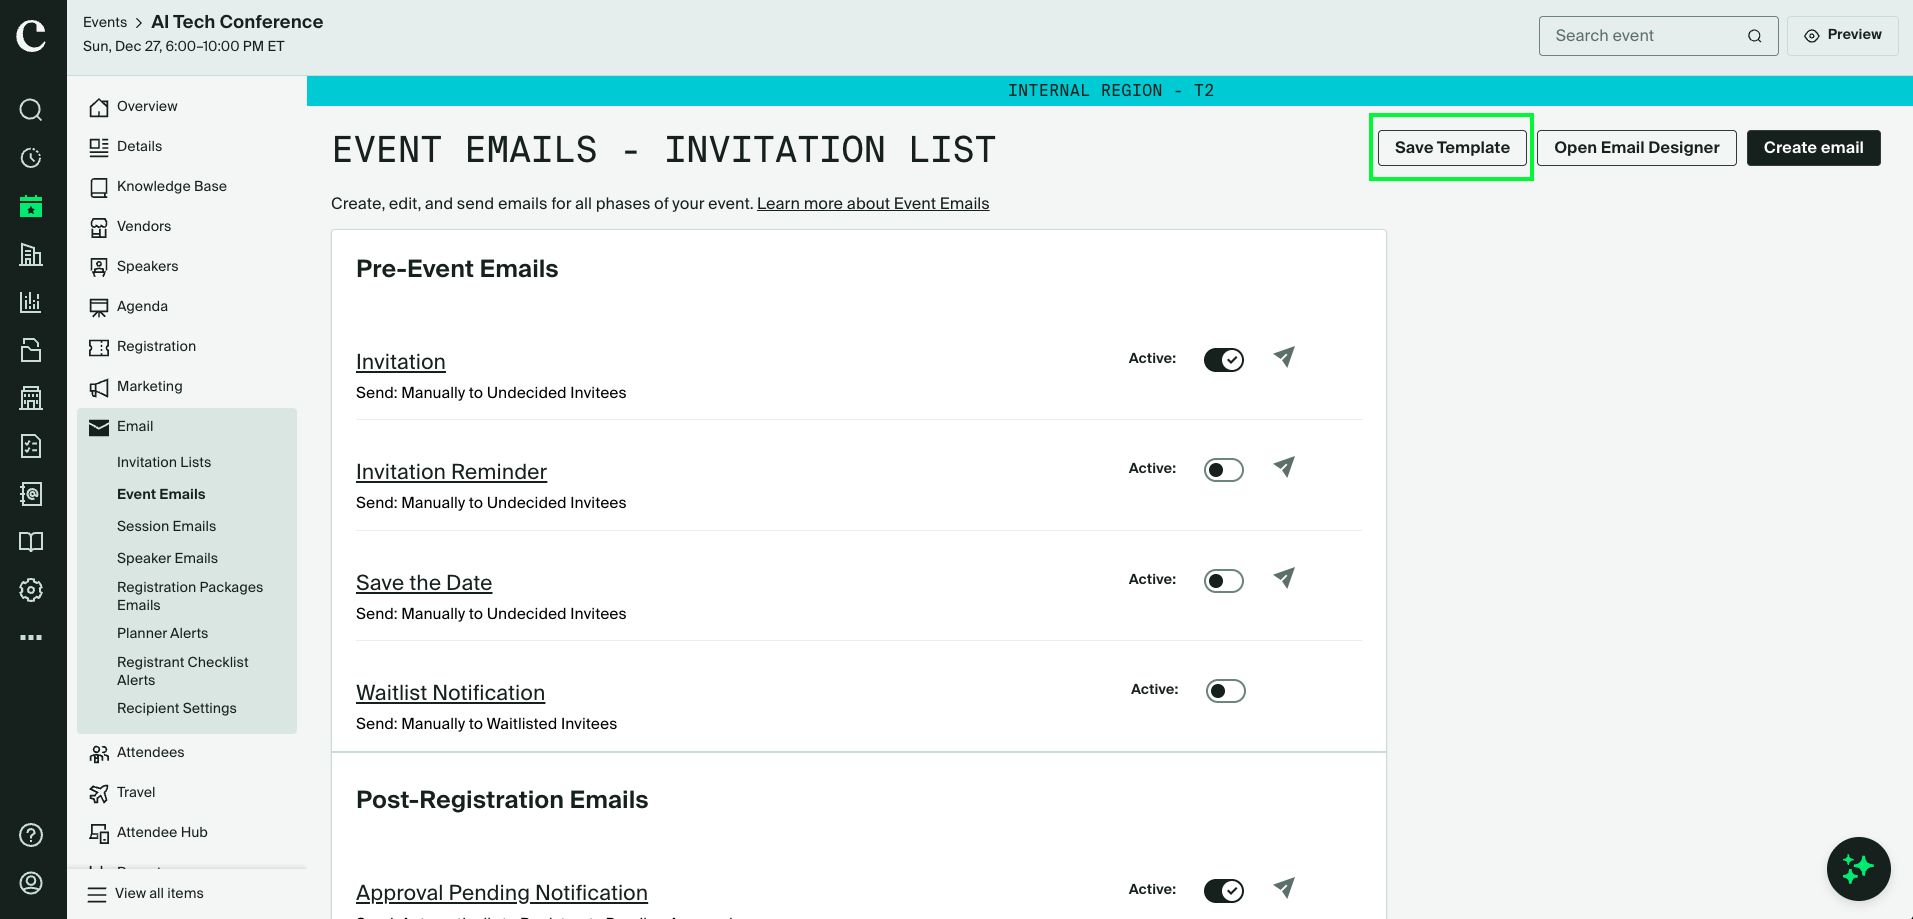
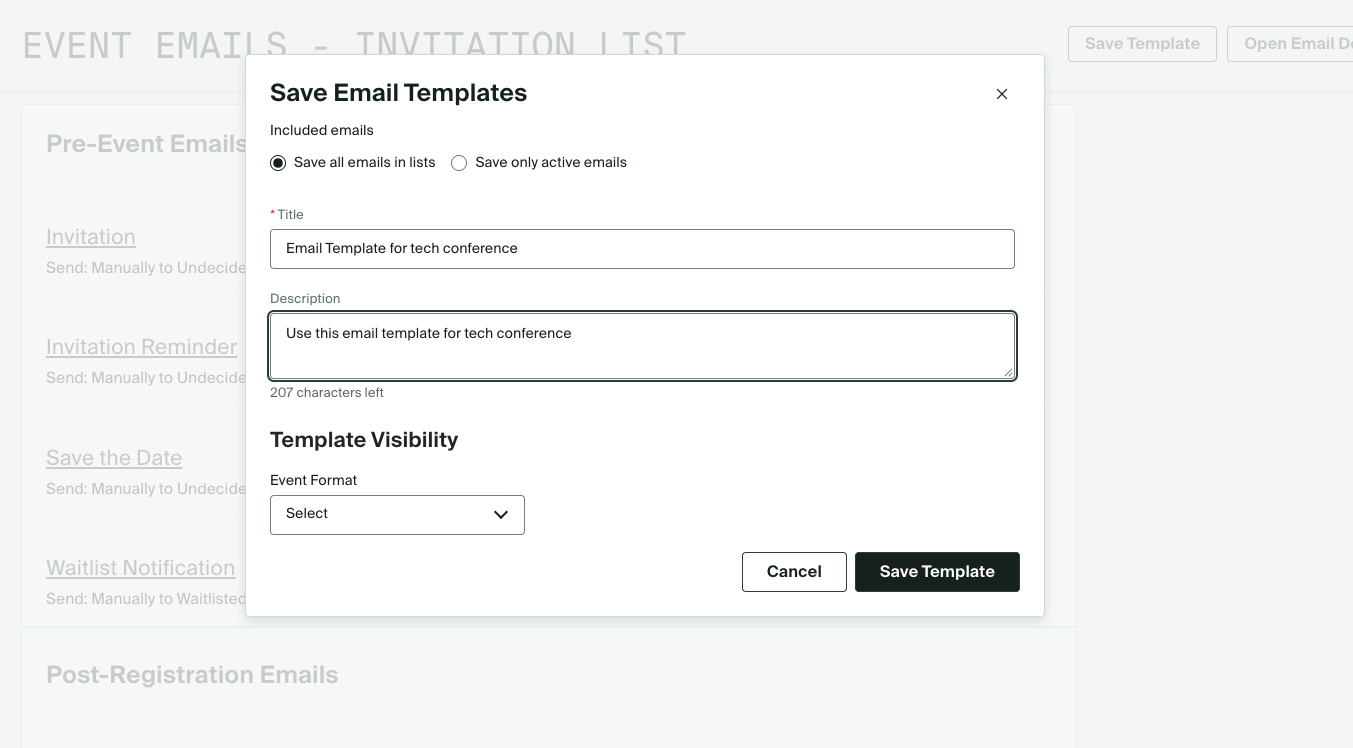
Save emails as a template: You can save the emails from an invitation list as a named template directly from the email list page, including either all emails or active emails only, and set visibility rules for the template, such as event format (Virtual, Hybrid, In-Person) and event custom fields, so it is offered only for the new events it is meant for.
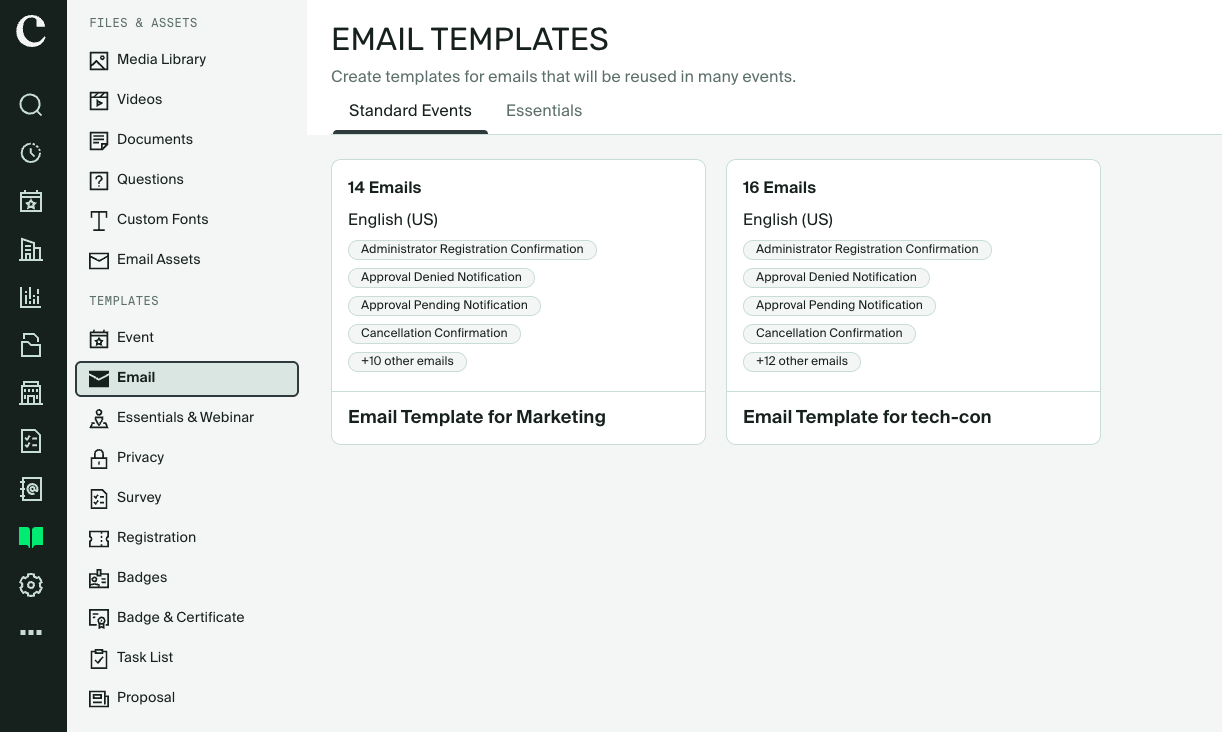
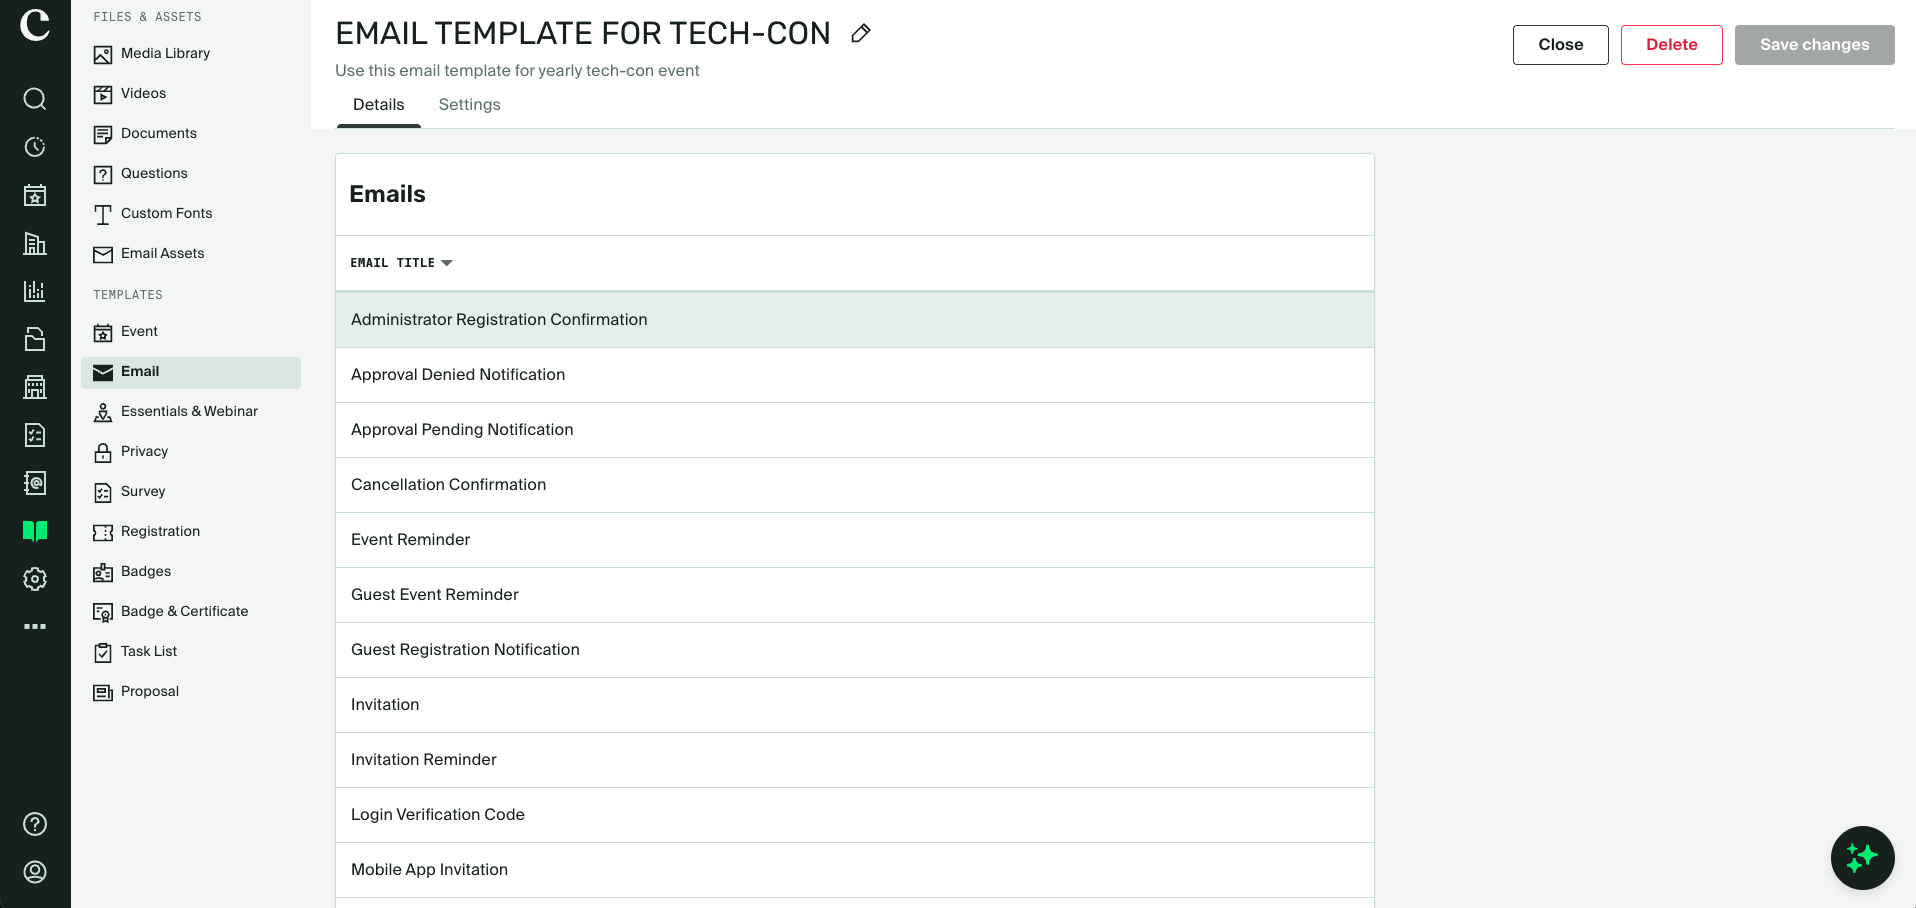
Admin-governed template library: Account admins can view and manage all email templates in the account from Admin > Library > Templates > Emails. They can rename templates, set visibility rules by event format (Virtual, Hybrid, In-Person) and event custom fields so each template is offered only for the right events, and delete templates that are outdated or no longer approved. This keeps only approved, on-brand templates available to planners.
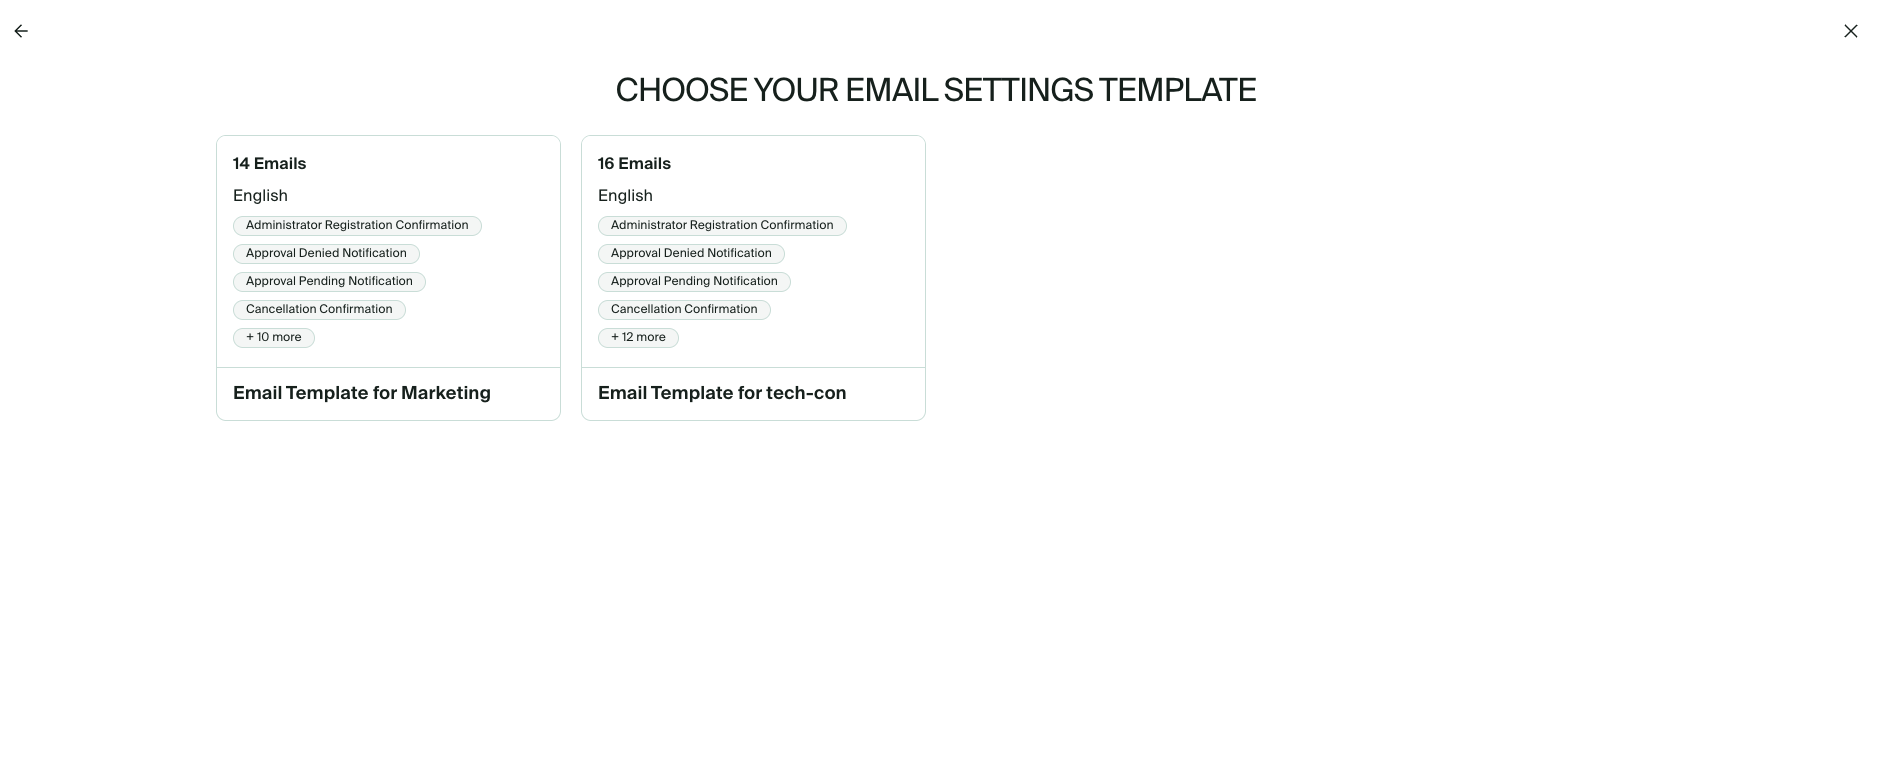
Template application at event creation: When a planner creates an event, templates whose visibility settings match the event’s format and custom fields are applied as the starting point for its emails.
If only one template matches, it is automatically applied to the event.
If more than one matches, the planner chooses which one to use.
If no template matches, Cvent default emails are applied.
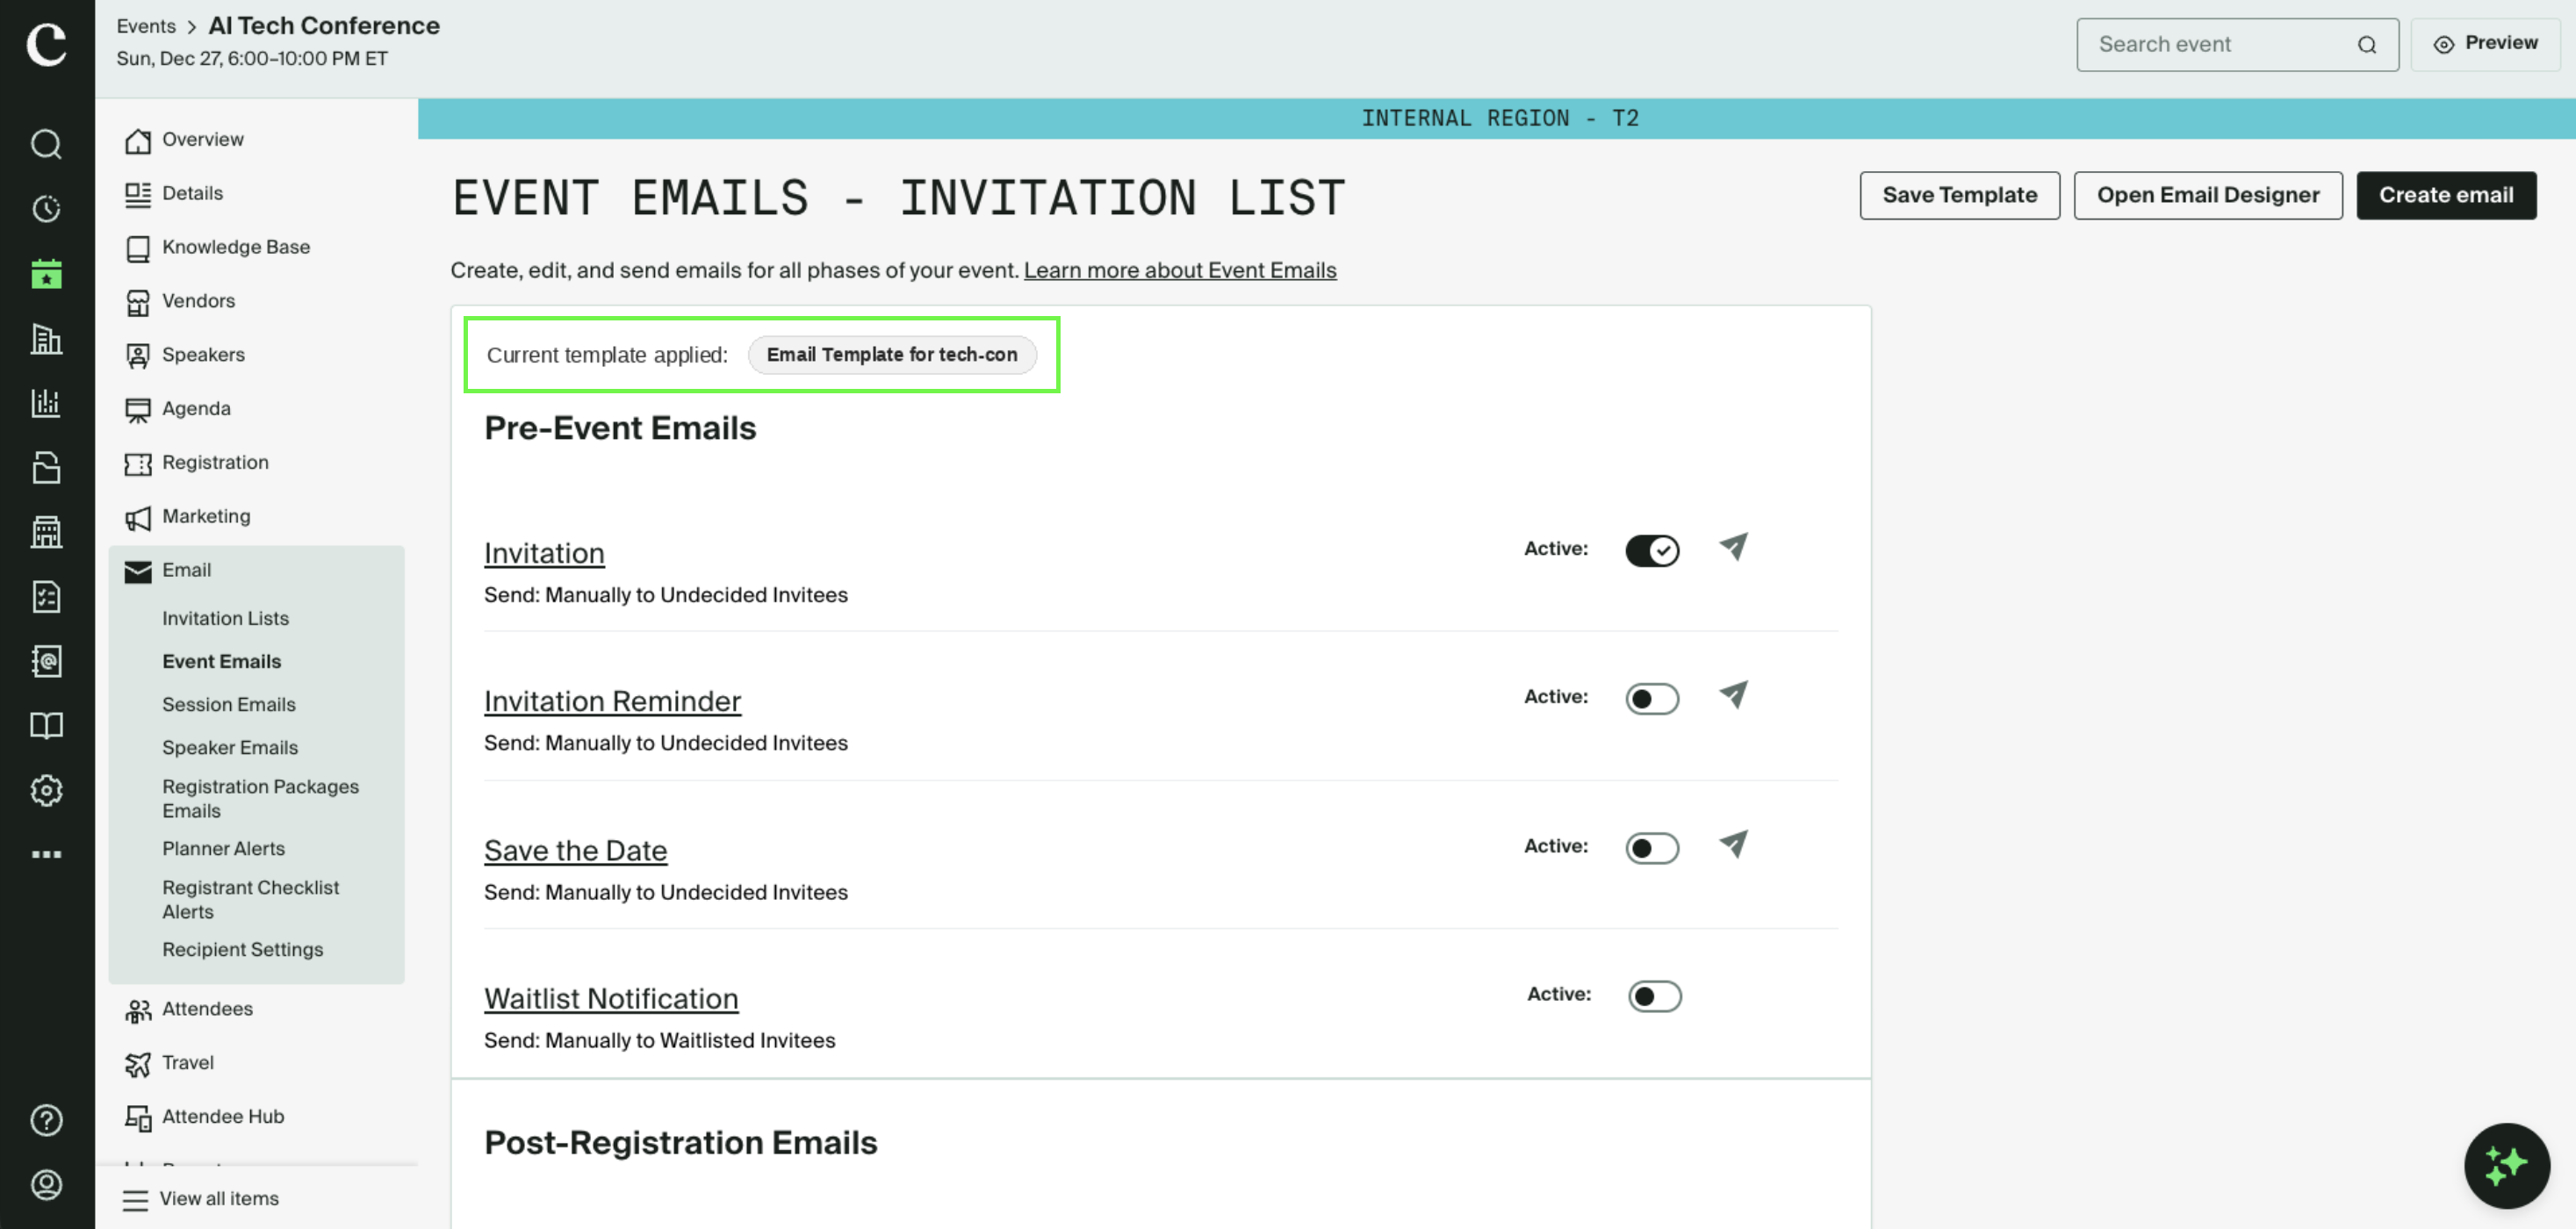
Planner flexibility post-application: Once a template is applied, planners retain full ability to add new emails and edit email content, subject lines, and schedules within their event. The template sets the baseline, not a locked configuration.
Things to Know
Saving and managing templates requires the Email Templates permission.
User Roles > Permissions > Admin > Library Permissions > Email Templates
Each email template supports a single language. Since templates are saved within an invitation list (which is language-specific), each template corresponds to a single language. Multi-language template bundles are planned for a future release.
Templates capture a static snapshot of the emails at the time of saving. Subsequent changes to the source event’s emails are not reflected in the template. Planners can create a new template from the updated email list at any time.
If a planner saves emails from the same invitation list more than once, a new template is created each time. There is no update in place, and the existing template remains unchanged.
Templates are offered only for events in the same language as the template. For example, a template saved in English is offered only when creating an English event.
Once a template is applied to an event, changes to the template do not sync forward to that event, and changes to the event’s emails do not sync back to the template.
Once a template is applied to an event, it cannot be changed or replaced with a different template. Planners can still edit the event’s emails as usual.
Deleting a template does not affect any events where the template has already been applied; those events retain their email configuration independently.
There is no limit on the number of templates an account can have.
Email Templates for Standard events are separate from the email templates used for Essentials events and Webinars. Templates saved from a Standard event can be applied only to new Standard events, and Essentials and Webinar email templates are not offered when a Standard event is created.
What’s not included in this release
Choosing individual emails: Planners cannot pick specific emails to include when saving a template. The only choice is between all emails and active emails only.
Email preview: Planners and admins cannot preview a template’s emails, either in the Admin Library or during event creation.
Editing template content: Admins can edit only a template’s name and visibility settings. Email content, design, and the list of emails in a template cannot be changed after the template is saved.
Creating templates in Admin: Templates can only be created from an existing event’s invitation list, not directly in the Admin Library.
Multi-language templates: Each template supports a single language. Emails in different languages cannot be combined into a single template.
Skipping a matching template: When a template matches the event, planners cannot skip it or choose Cvent default emails instead.
Applying to multiple invitation lists: A template is applied only to the event’s default invitation list.
Changing the template on an existing event: Templates are applied only when an event is created. A template cannot be re-applied or switched on an existing event.
Ask the Right Questions for Every Train Request
Planners can now link custom event questions to train requests, so registrants only answer the follow-up questions that match how they're actually getting to the event. This release builds on Train Travel and gives train requests the same question support flight requests already have, from the registration form through the attendee record, reports, and event emails.
Questions can be linked to train requests alone or to both train and flight requests. Planners can also set up alternative travel questions that are shown only when a registrant doesn't submit a request of that type, such as asking registrants who aren't taking the train how they plan to arrive.
Before this release, event questions could only be connected to flight requests. Planners who needed train-specific details had to show the question to every registrant, whether or not they were taking the train, or follow up with registrants outside the registration form.
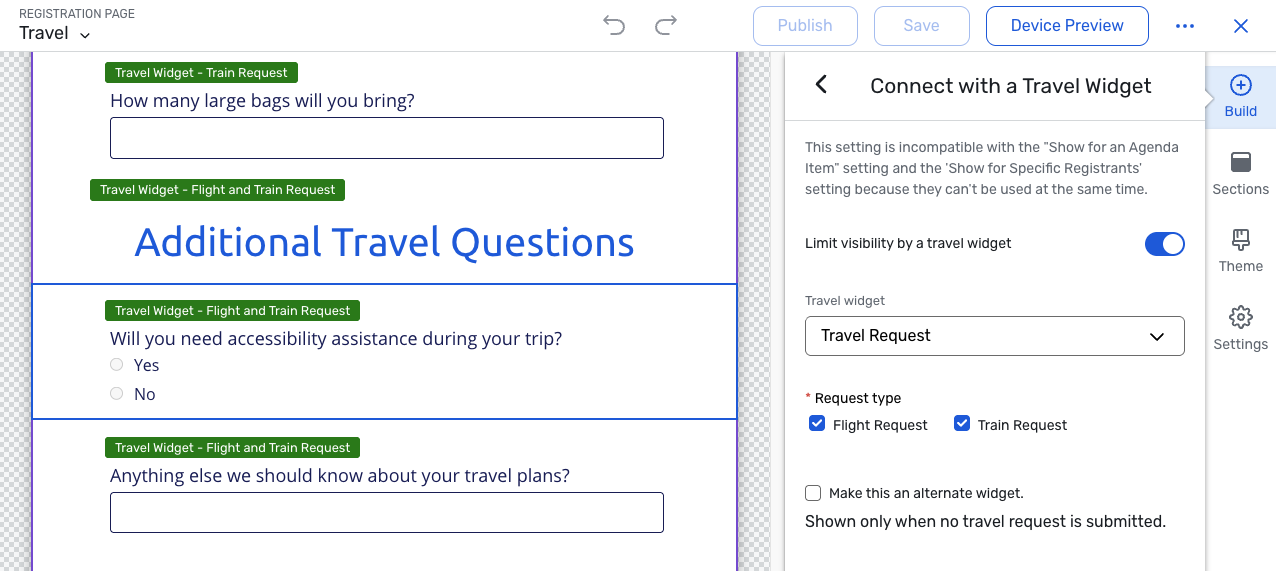
Planners can link a custom event question to train requests, flight requests, or both in Site Designer:
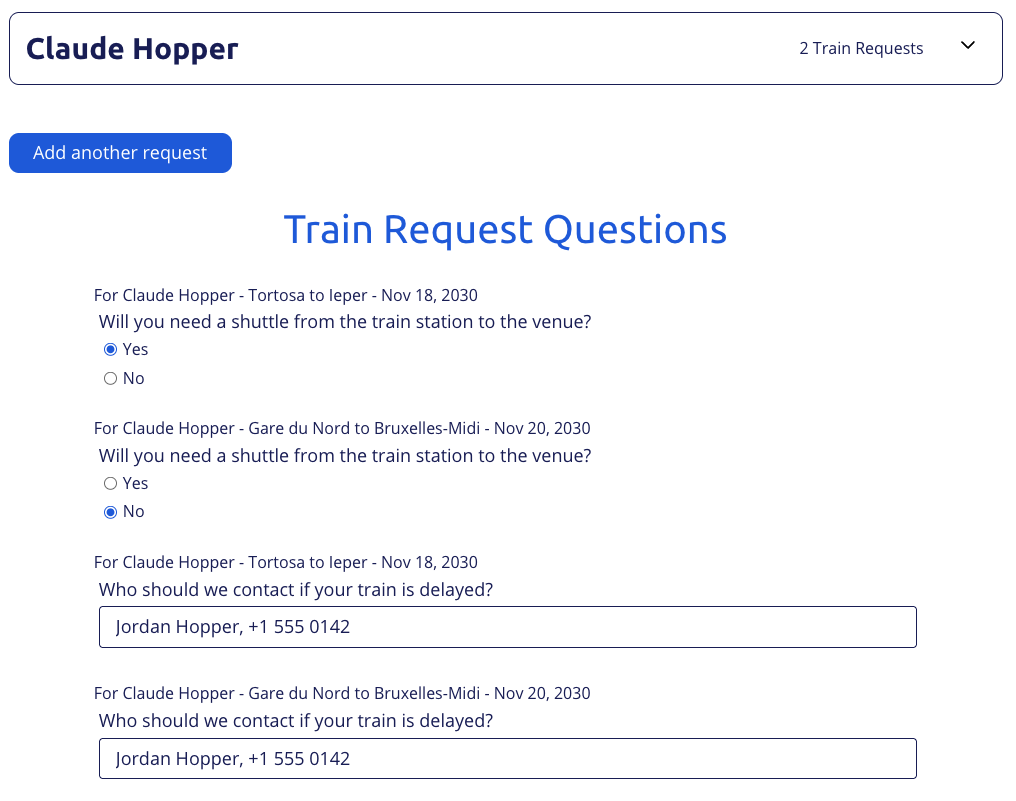
Registrants can answer questions for each train request during registration:
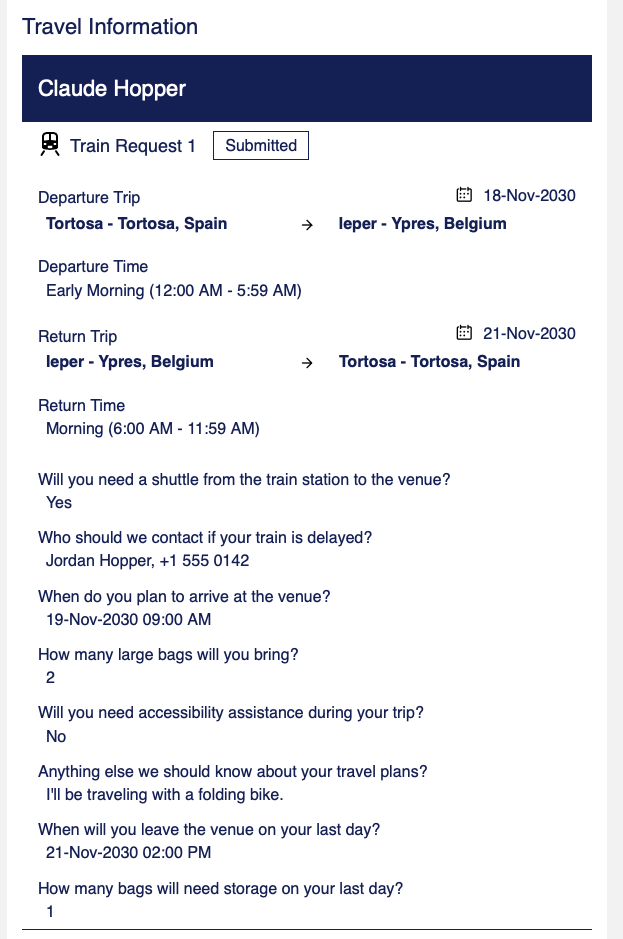
Registrants can review their answers for each train request on the Registration Summary:
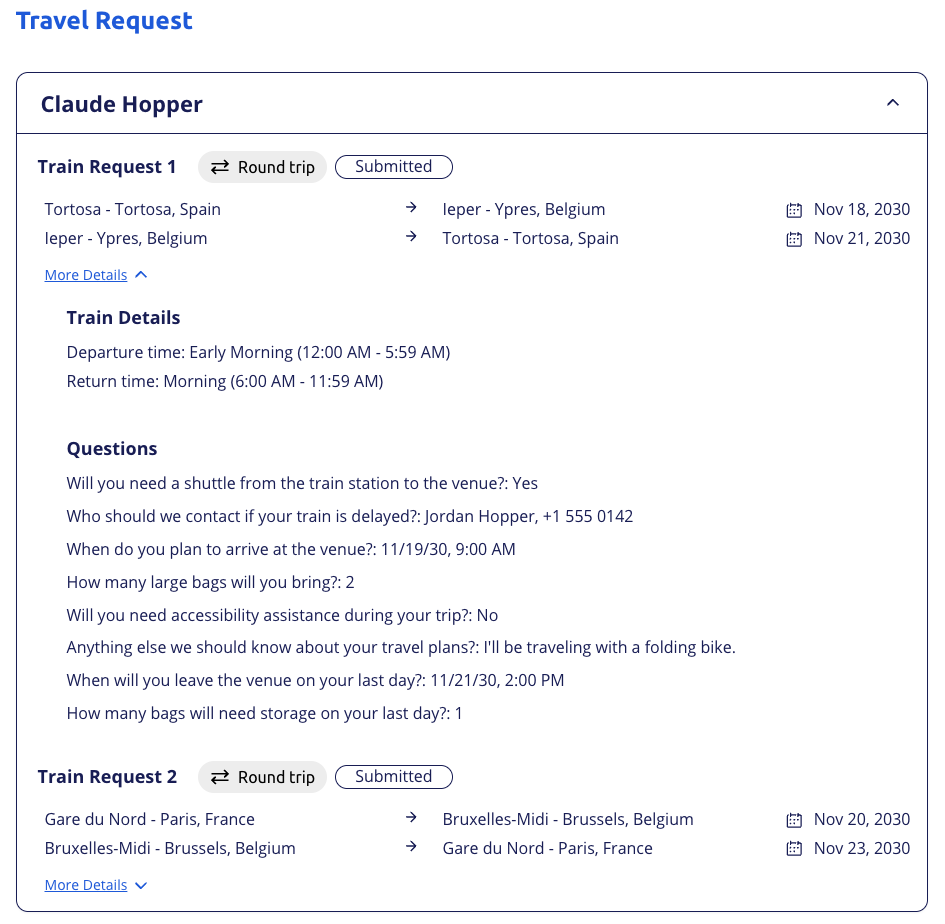
Planners can review and edit train request answers from the Attendee Travel tab:
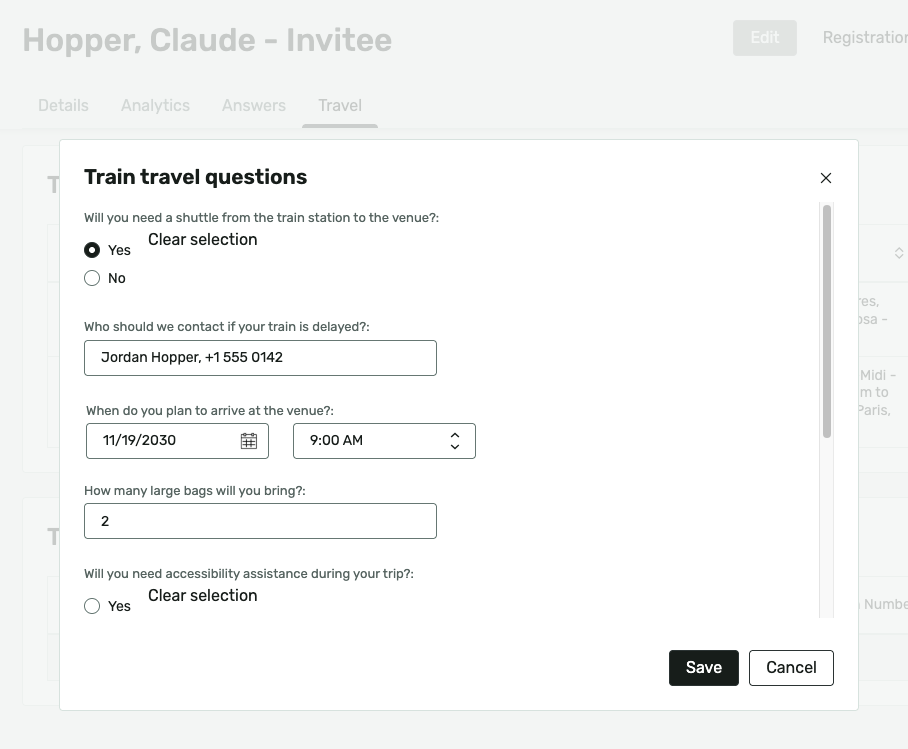
Registrants can view their train request answers in event emails:
Key capabilities include:
Event questions linked to train requests: In Site Designer, planners can now choose Train Request when connecting a custom event question to the travel widget, either on its own or together with Flight Request. Text page elements can be connected the same way.
Registrant questions for each train request: Registrants answer linked questions for each train request during registration. Each question is labeled with the passenger name, departure and arrival stations, and departure date, so registrants with more than one train request (or guests traveling with them) know exactly which trip they're answering for.
Reporting on answers: Planners can add train request questions to the Travel Request Details by Registrant report and alternate train questions to the Alternate Travel Answer Details report, then filter by answer.
Alternate travel answers in the REST API: Teams using the REST API can now retrieve answers to alternate questions linked to train requests or to both flight and train requests through the alternate travel answers endpoint.
Audience Segments - Support for Professional and Discovered Interests in Dynamic Segments
Dynamic Audience Segments now supports attendee interests. A new Attendee Interests category in the rule builder lets you target attendees based on what they care about, not just who they are or what they’ve done. There are two types: Professional Interests, which attendees select themselves, and Discovered Interests, which Cvent identifies from attendee behavior.
Attendees choose Professional Interests on their Attendee Hub profile from a list you set up for the event, such as AI and Machine Learning, Marketing Strategy, or Sustainability. Because attendees provide these before the event starts, they’re a reliable signal for promoting the right sessions, forming networking groups, and giving sponsors an early look at who’s attending.
Discovered Interests are based on what attendees do in Attendee Hub, including the sessions they attend, the exhibitors they interact with, and what they search for. They come from the same AI that powers the Event Interest Insights Dashboard, so the interests you see in the dashboard are the same ones you can segment on. Because they update as attendee behavior changes, they work well for in-event recommendations, sponsor targeting, and follow-up based on what attendees actually engaged with.
Professional Interests are available to all accounts. Discovered Interests are only available to customers enrolled in the Event Interest Insights Dashboard closed beta.
Setting up rules in Audience Segments
Professional Interests
Once Professional Interests are set up in Attendee Hub, go to Attendee List > Audience Segments and create or edit a Dynamic Segment.
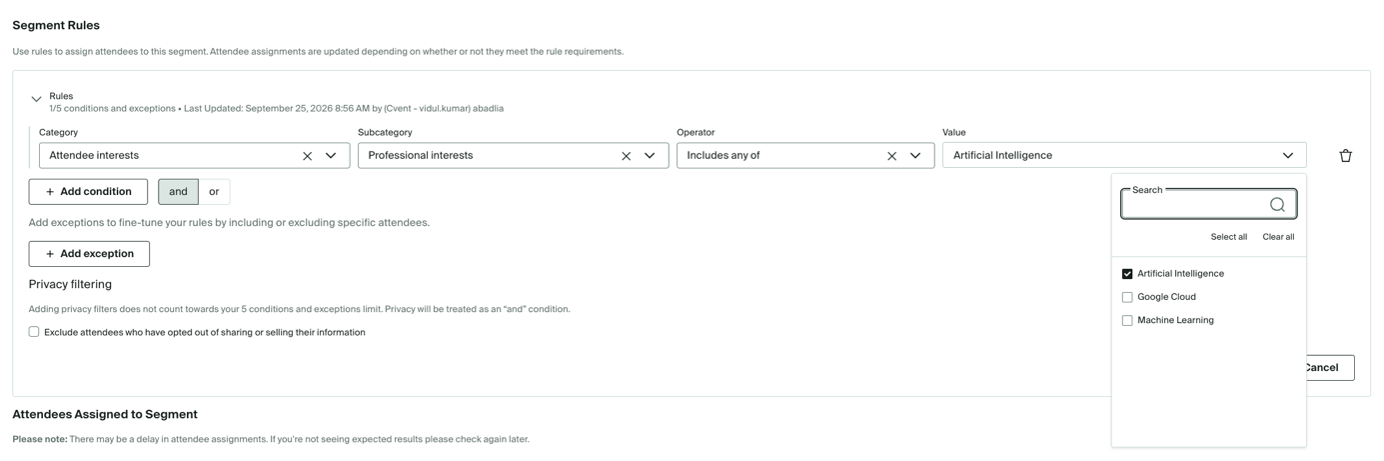
Choose the Attendee Interests category, then Professional Interests.
Pick an operator and select one or more interests. The dropdown lists the interests configured for your event.
The available operators are Equals, Does not equal, Includes any of, Does not include any of, Includes all of, Does not include all of, Is blank, and Is not blank.
Discovered Interests
Go to Attendee List > Audience Segments and create or edit a Dynamic Segment.
Choose the Attendee Interests category, then Discovered Interests.
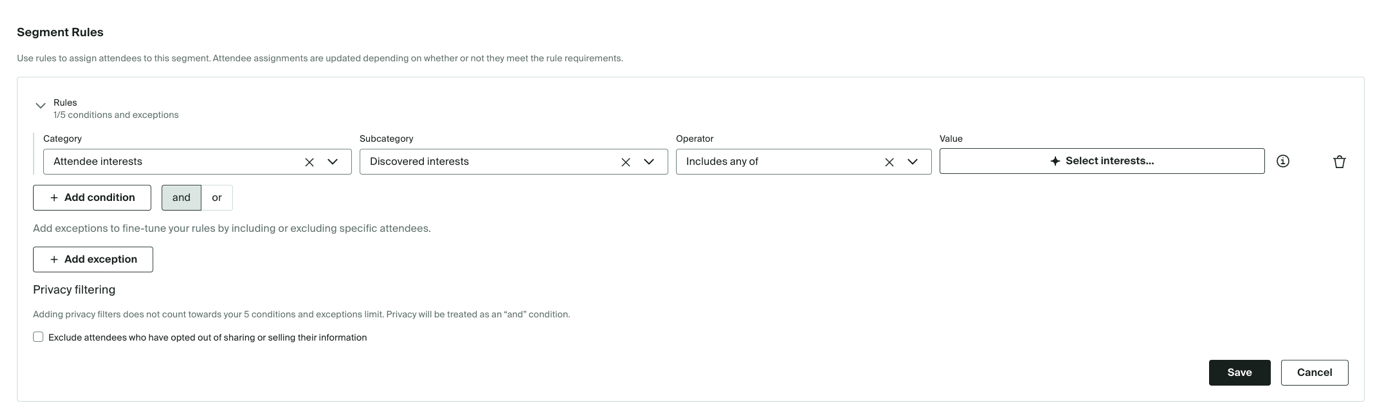
Select Includes any of and open the interests picker. Each interest shows how many attendees are currently associated with it.
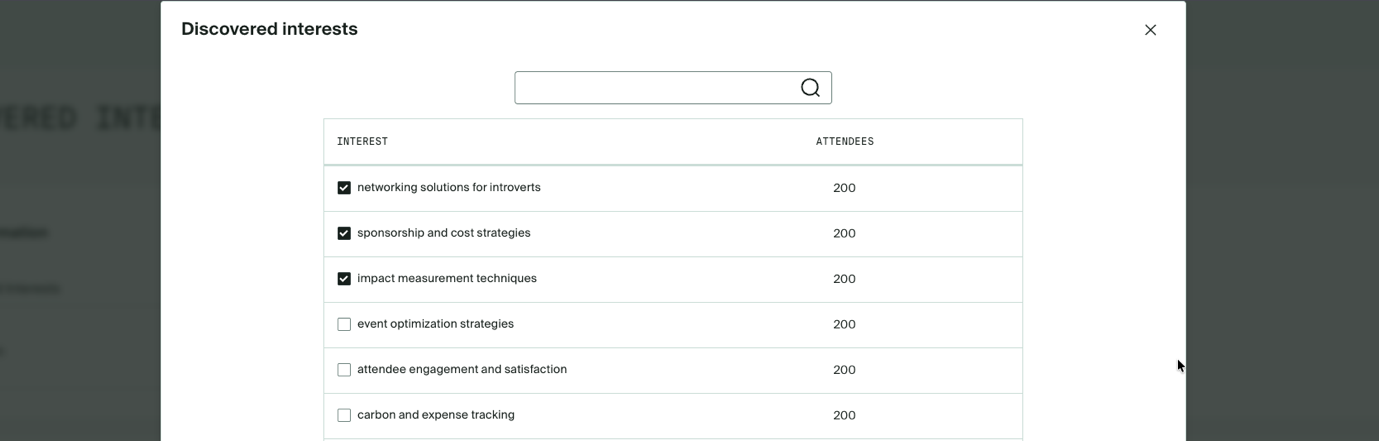
Search or scroll, select up to 50 interests, and save.
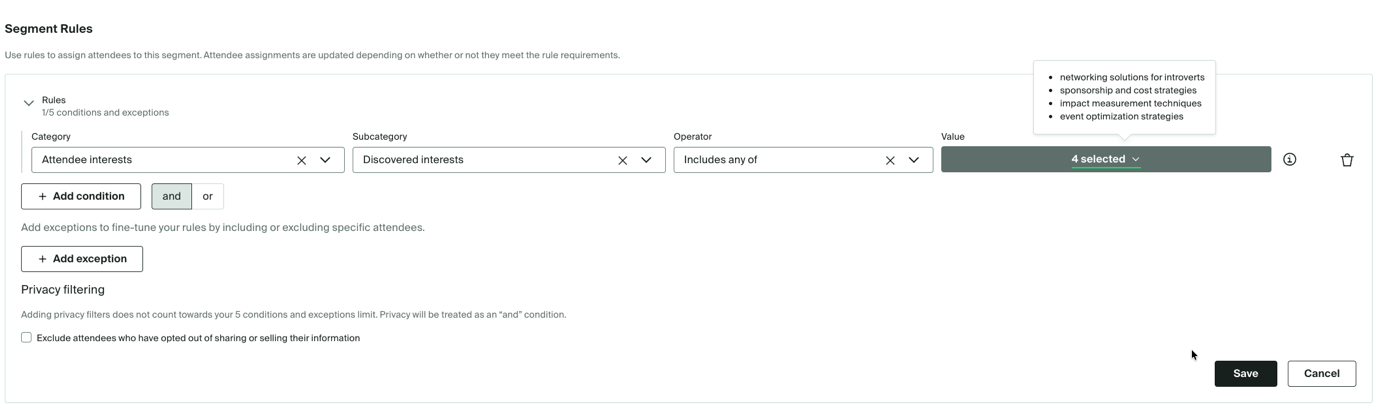
What to know
Professional Interests
The Professional Interests sub-category only appears once Attendee Hub is enabled.
If an attendee hasn’t selected interests for an event, Cvent uses the interests saved on their contact profile instead, so some attendees may qualify without having touched their event profile.
If you delete an interest from the event after using it in a segment, the rule shows a validation warning and you’ll need to update it. Existing members aren’t removed automatically.
This works in both new and existing events.
Discovered Interests (available for Event Interest Insights Dashboard closed beta only)
Because interests are generated from attendee activity, the picker may show an empty state for events that haven’t started or don’t have enough activity yet. It fills in once interests are available.
Only attendees who have opted in through the Discovered Interest Opt-In (Attendee Hub > Compliance) can match a Discovered Interests condition.
Discovered Interests use AI-based matching, so an attendee can be included when their interests are closely related to the one you selected, even if the wording is different. This means the attendee count in the picker is an estimate, and your final segment size may differ slightly.
Interest labels are AI-generated and can change as Cvent learns more about your event, but your segment keeps working without any action from you. If an interest you selected drops off the list, it still appears in your rule when you edit the segment. Once you change the value and save, you can’t reselect it.
Segments update automatically as attendee interests change, so there’s no need to refresh them.
At launch, the only operator available is Includes any of. You can combine it with any other rule, including Professional Interests, to compare what attendees said they’re interested in with what they actually engaged with.
This works in new and existing events for accounts enrolled in closed beta.
Access Controls for Private Events with External Authentication
Planners running private events with external authentication can now choose how access is decided. They can keep the current model, where verified identity is enough to register, or require registrants to also be on the event's invitation list.
As part of this release, external authentication can confirm who someone is while the invitation list decides who gets in. This allows invitation-only, VIP and compliance-sensitive events tighter control over headcount and attendance, including events shared by direct link instead of Cvent invitation emails.
User Personas:
Planners get a second layer of access control for private events, set per registration path.
Registrants get a consistent, clearly worded outcome when registration isn't open to them.
Setting: "Restrict externally authenticated registrants to invited contacts only"
Where: Site Designer > Reg Path Settings > Privacy Settings
Default: Off
Available when both are true:
Reg path privacy is set to "Only those on invitation lists" or "Only those on certain invitation lists"
External authentication is configured under Event Settings > Security > Website Authentication
Supported methods: HTTP Post, Legacy SSO, OIDC (OAuth) and SAML
Choosing an access model

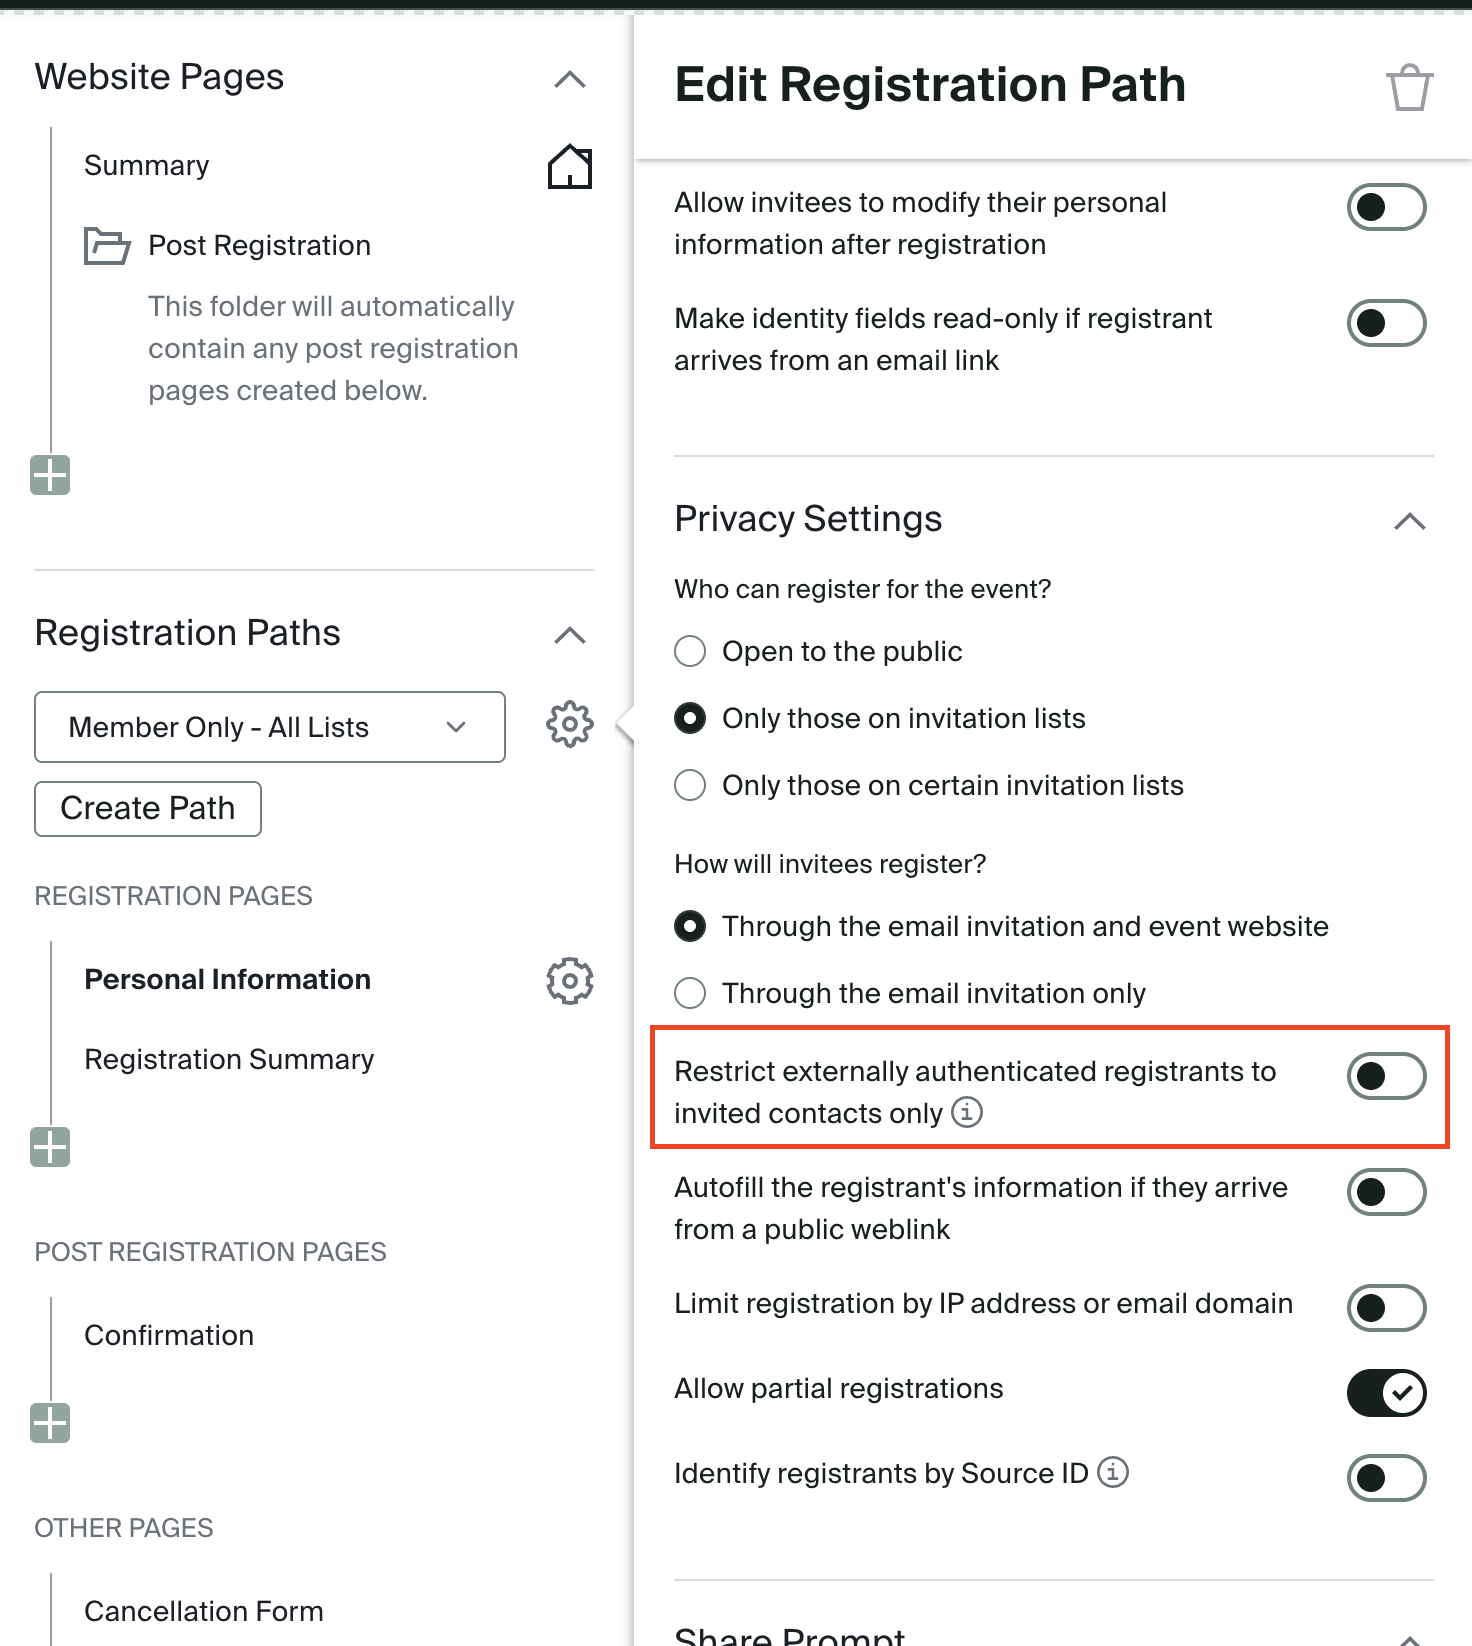
How the invitation list check works
When the new setting is on, it uses the privacy option already selected on the reg path:
Only those on invitation lists: the registrant must be on at least one invitation list for the event.
Only those on certain invitation lists: the registrant must be on a list assigned to this reg path. For example, a contact on the VIP list can't register through a General path restricted to a different list.
Registrants who don't meet the check see "Registration is not available."
Good to know:
Existing events keep their current access model unless a planner turns the setting on.
Authentication setup, Address Book matching and invitation list management are unchanged.
If a reg path is switched to "Open to the public," the setting is hidden and its saved state is kept. Switching back restores it.
Before enabling the toggle:
Confirm your invitation lists are complete. Anyone not on the relevant list won't be able to register.
If you use "certain invitation lists," check each path's list assignment.
Registration Paths API: Waitlist Eligibility by Path
A registration path that hits capacity can still accept waitlist signups, but until now our API's didn’t say which paths allow it. Integrations had to treat a full path as sold out, which sent registrants to a dead end and lost demand the event could have kept.
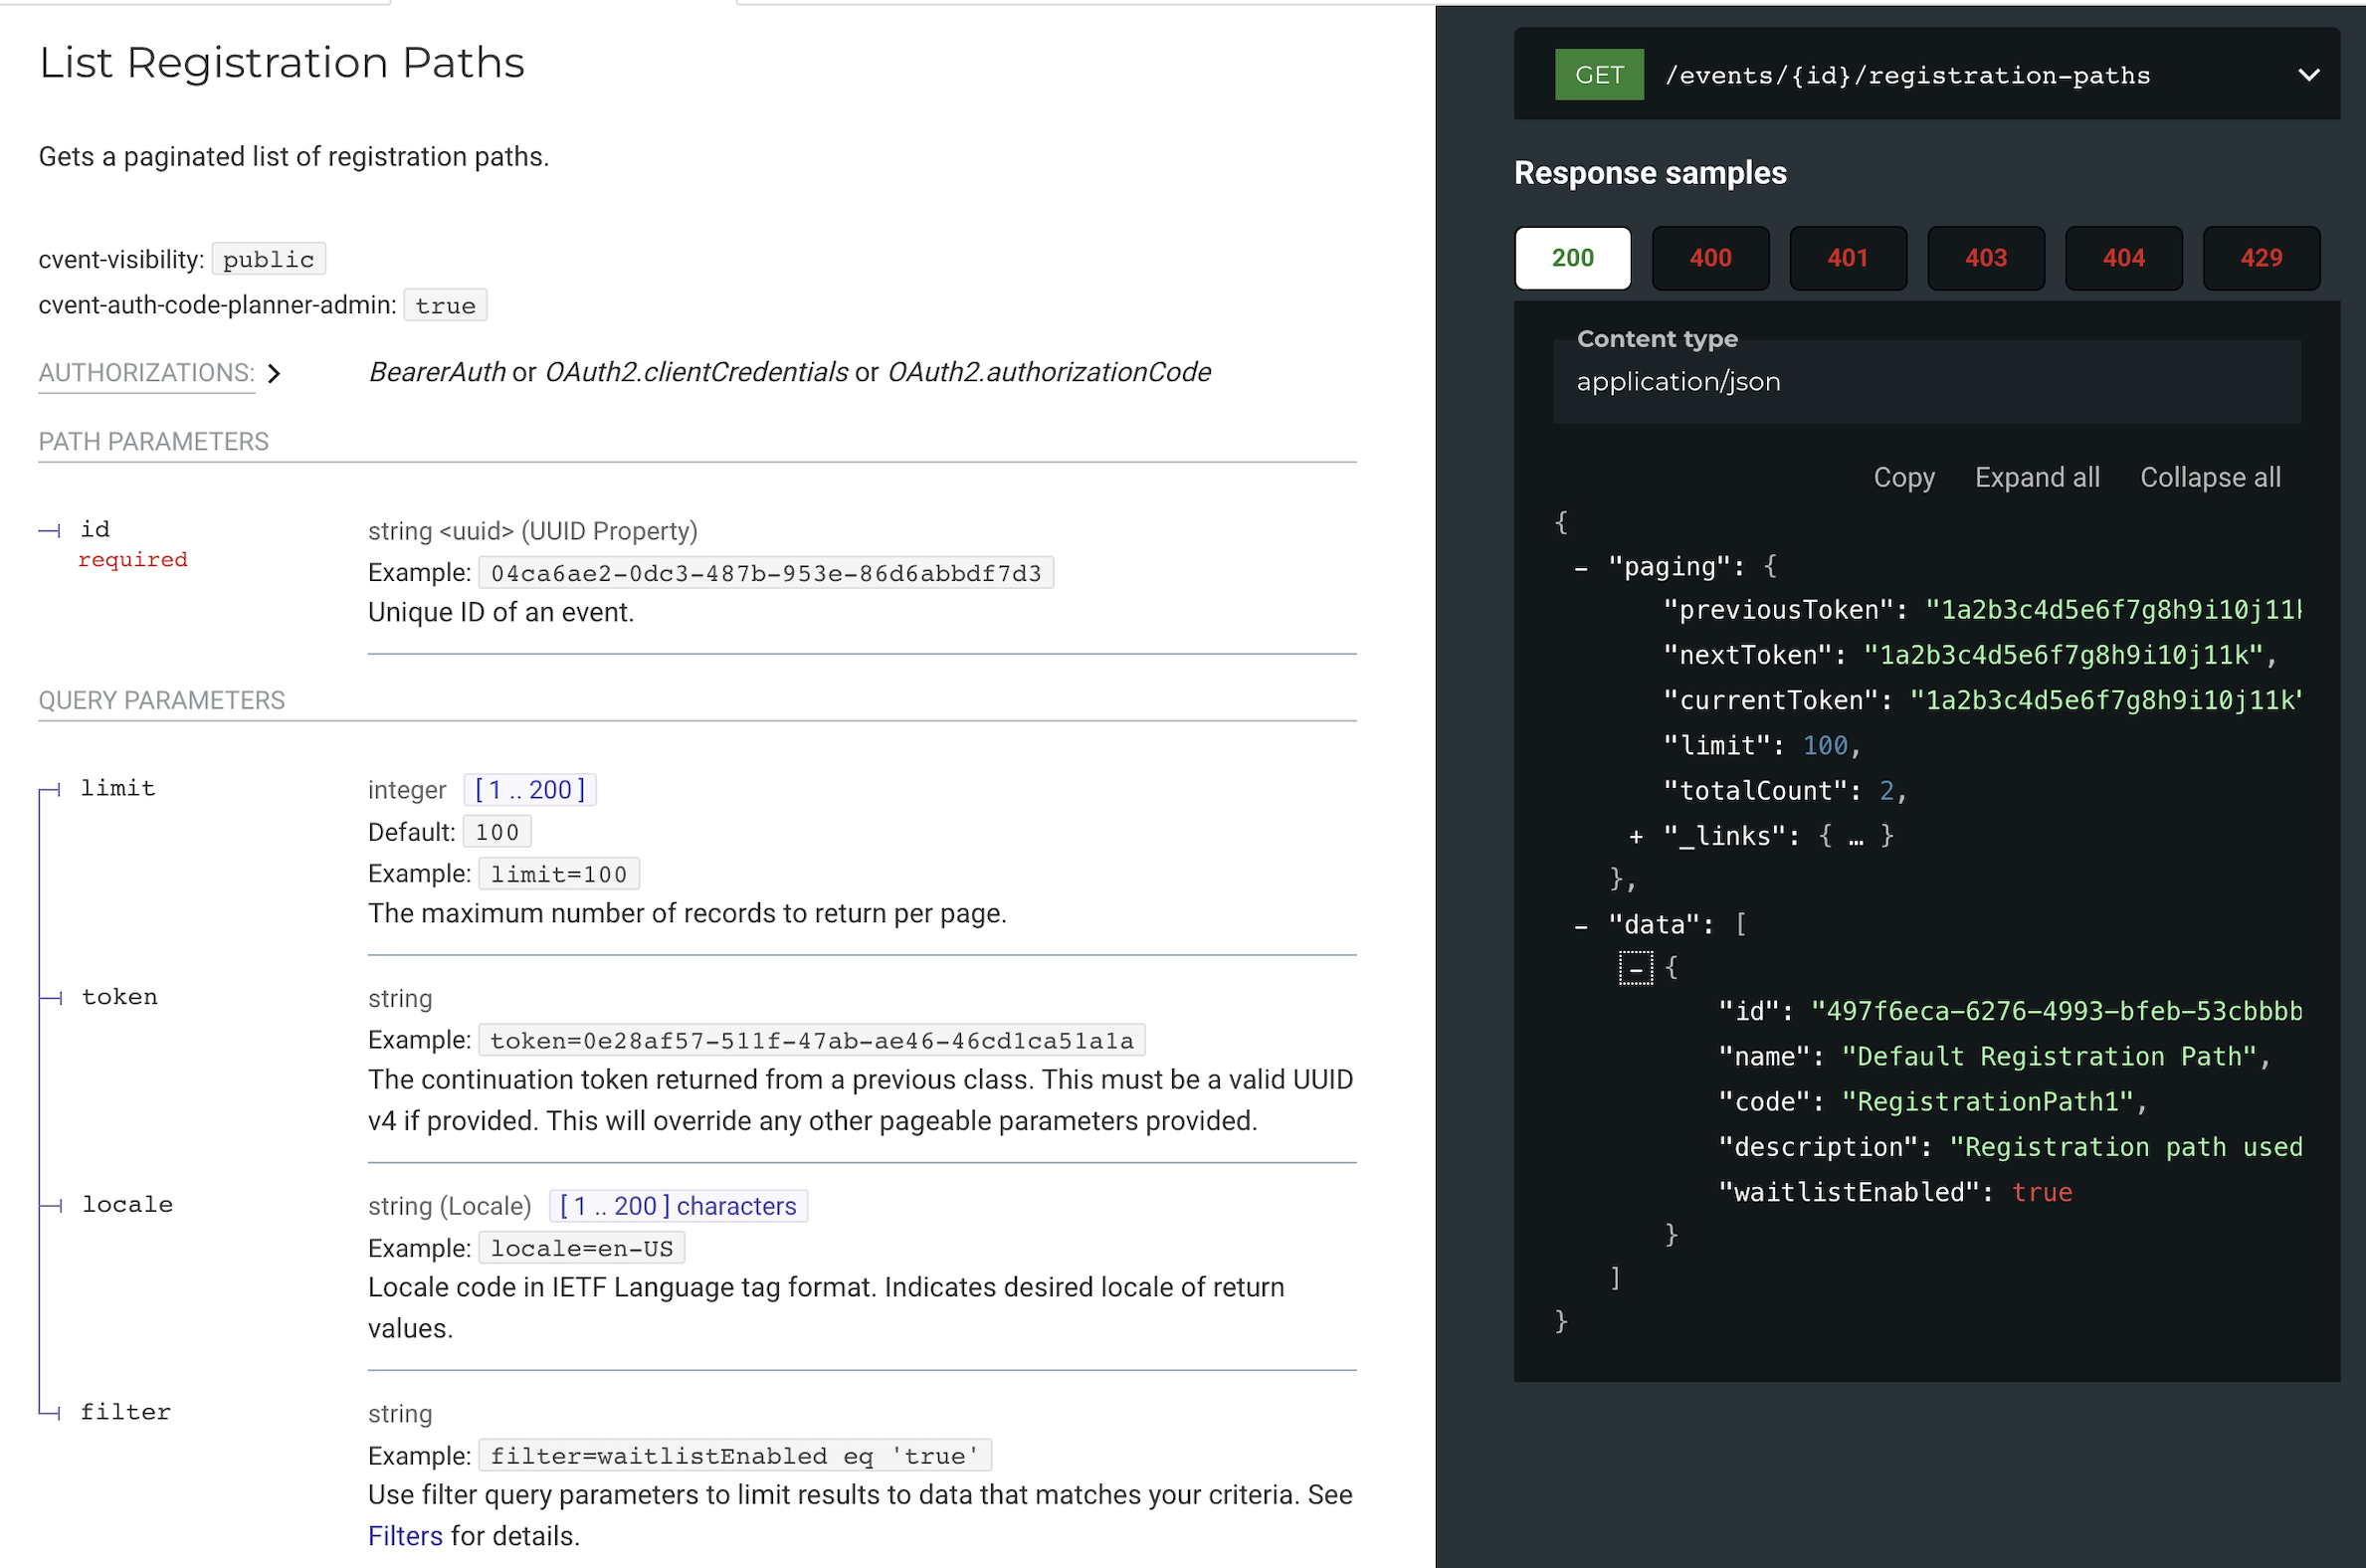
The Registration Paths API now gives integrations (Custom sites & Partner portals) the information they need to show “Join waitlist” when a path allows it, helping registrants find a way forward and reducing missed registration opportunities.
User Personas:
Integration developers and partners can read and filter waitlist eligibility for each path directly from the API, with no hardcoded assumptions or workarounds.
Planners see the waitlist settings they configure in Cvent applied in the partner-built experiences their registrants use.
Registrants get a next step when a path fills up, instead of a sold out message.
Things to Note:
List Registration Paths (
GET /events/{id}/registration-paths) now returnswaitlistEnabled, a read-only boolean, on every registration path.To return only paths that accept waitlist signups, use
filter=waitlistEnabled eq 'true'. See Filters for full syntax.The value comes from the path’s published configuration. Unpublished changes don’t appear until the event is published.
Values are set per path, so one event can return
truefor one path andfalsefor another.waitlistEnabledtells you whether a path accepts waitlist signups.This change is additive. Existing fields and behavior are unchanged. The field is available only at the registration-path level.
Endpoint: List Registration Paths
Additional Resources
Cvent Community: Questions about the above updates? As always, get answers in the Community via the Open Forum.
Beta Opportunities Page: Try new features and products out before full launch availability. Join Beta Programs.